
Whether you're a novice or a seasoned grower, mastering the art of drying and curing is essential for unlocking the full potential of your harvest.
In this beginner's guide to drying and curing cannabis, we unveil the ultimate tips to elevate your end product.
Neglecting these critical steps could result in lacklustre buds with diminished potency and flavour.
But fear not! With our expert insights and practical tips, you'll learn how to transform your carefully nurtured plants into premium-quality product.
From optimal drying temperatures to precise curing techniques, we've got you covered every step of the way. Get ready to embark on a journey to drying and curing perfection!
Disclaimer: Any information given on this site is for educational purposes only. Please ensure if you’re growing cannabis, you’re doing so in accordance with the law and subject to appropriate permissions and licenses of the applicable country.
Understanding the basics
Before diving into the intricacies of drying and curing, it's essential to grasp the fundamental concepts behind these processes. Here's what every beginner needs to know:
Purpose of drying and curing: Curing and drying are crucial post-harvest processes that enhance the quality, flavour, and potency of cannabis buds. Drying cannabis removes excess moisture while curing buds allows them to mature and develop their full potential.
Impact on quality: Properly dried and cured cannabis boasts improved aroma and flavour, smoother smoke, and heightened potency compared to poorly processed buds. These processes are essential for unlocking the full spectrum of cannabinoids and terpenes present in the plant.
Key factors to consider: Temperature, humidity, and airflow play a significant role. Understanding how these variables interact is essential for achieving optimal results.
By grasping the basics of drying and curing, you can lay a solid foundation for successful cultivation practices. With this knowledge, you'll be better equipped to navigate the subsequent steps and elevate your cannabis cultivation game.
Essential equipment
To embark on your journey to mastering the art of drying and curing cannabis, it's crucial to equip yourself with the right tools. Here's a breakdown of the essential equipment every beginner should have:
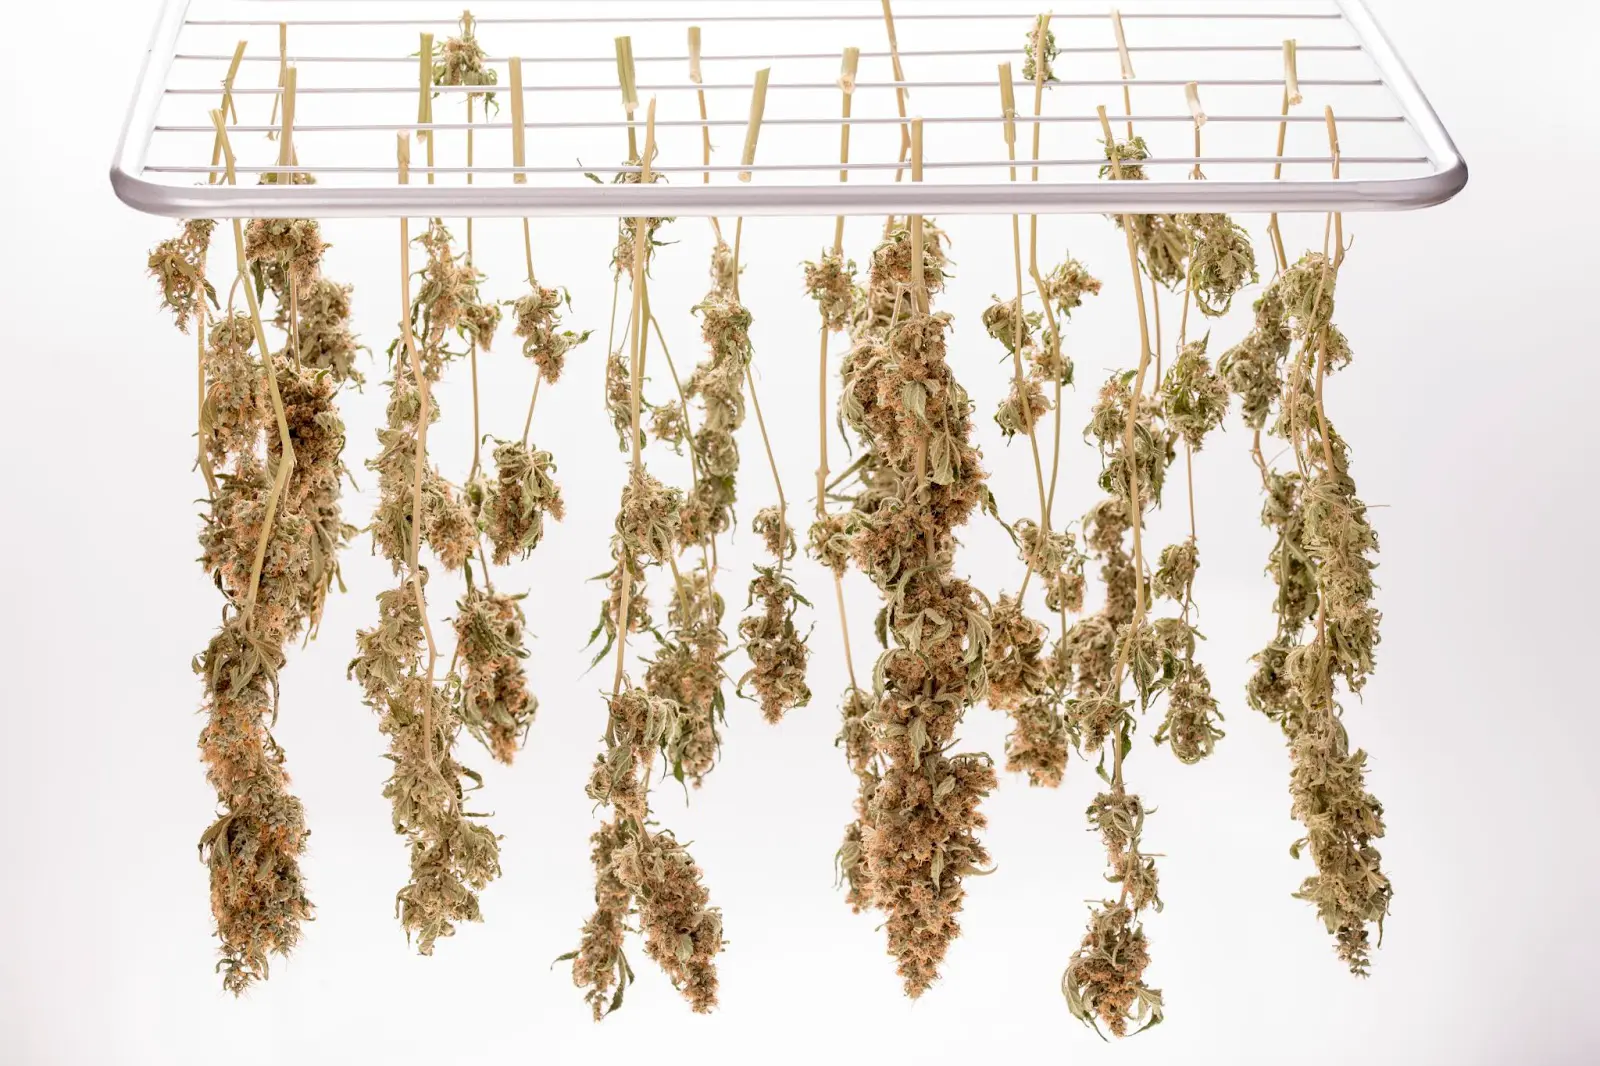
A drying rack or hanging string
Purpose: Provide a drying rack to hang harvested plants or individual buds for drying cannabis.
Importance: Proper airflow around all the buds is essential for even drying, which helps prevent mould and mildew.
Tips: You can buy a drying rack from gardening stores or online suppliers. Alternatively, you can make one yourself using materials like mesh screens or laundry hangers.
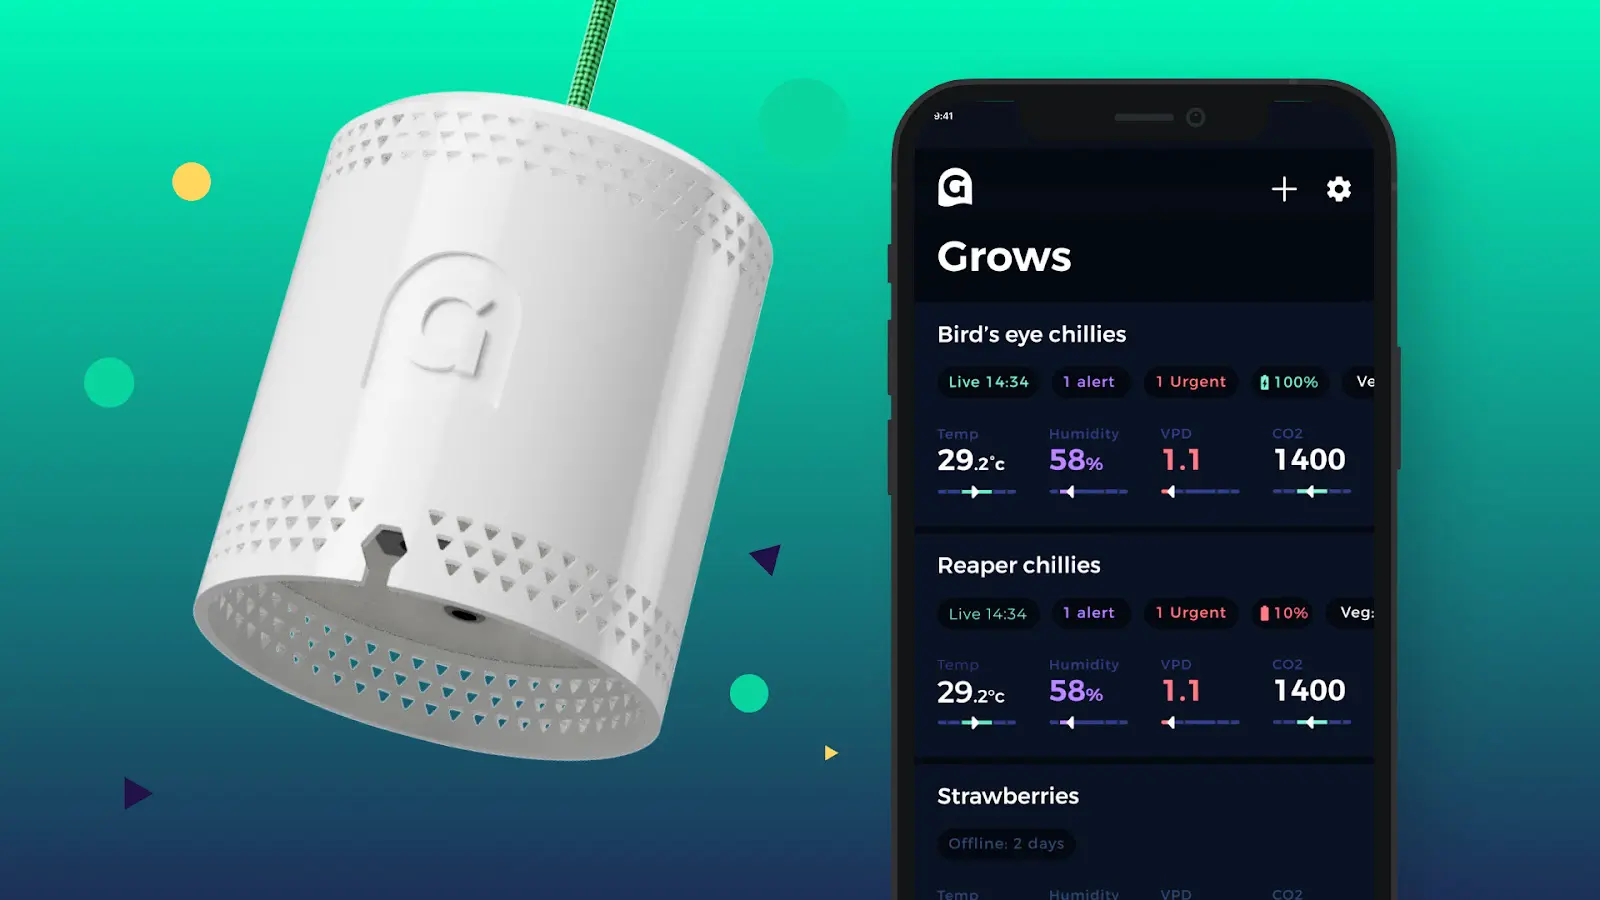
Hygrometer or environmental sensor
Purpose: Environmental sensors (like the Grow Sensor) allow you to measure and control temperature and humidity levels in your drying and curing space.
Importance: Maintaining optimal environmental conditions is critical to achieving the desired flavour, potency, and overall quality of your cannabis.
Tips: Hygrometers are readily available at hardware stores, garden centres, or online retailers. Look for digital hygrometers with accurate readings for precise monitoring.
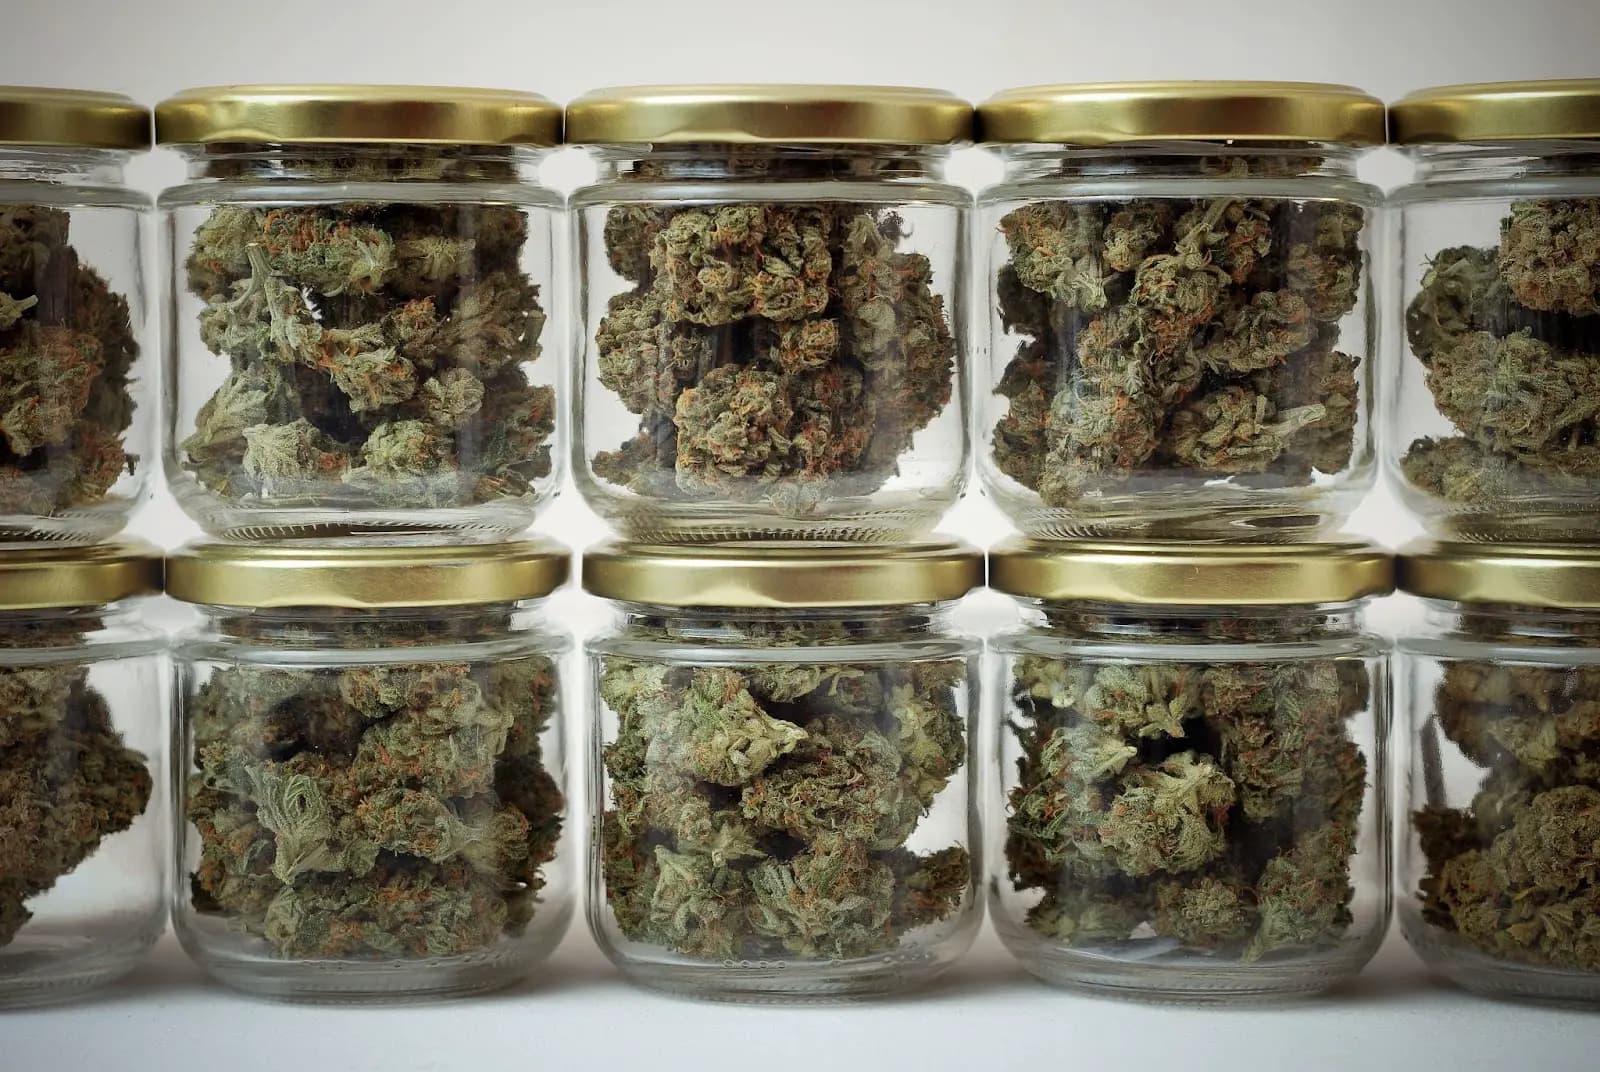
Containers for curing
Purpose: Store dried cannabis buds during the curing process.
Importance: Curing in airtight containers helps develop and enhance the final product's aroma, flavour, and smoothness.
Tips: Mason jars are an excellent choice for curing cannabis due to their airtight seals and glass construction. You can also repurpose glass food jars with tight-fitting lids as an economical alternative. Never use plastic bags, as they promote a moist environment that leads to mold.
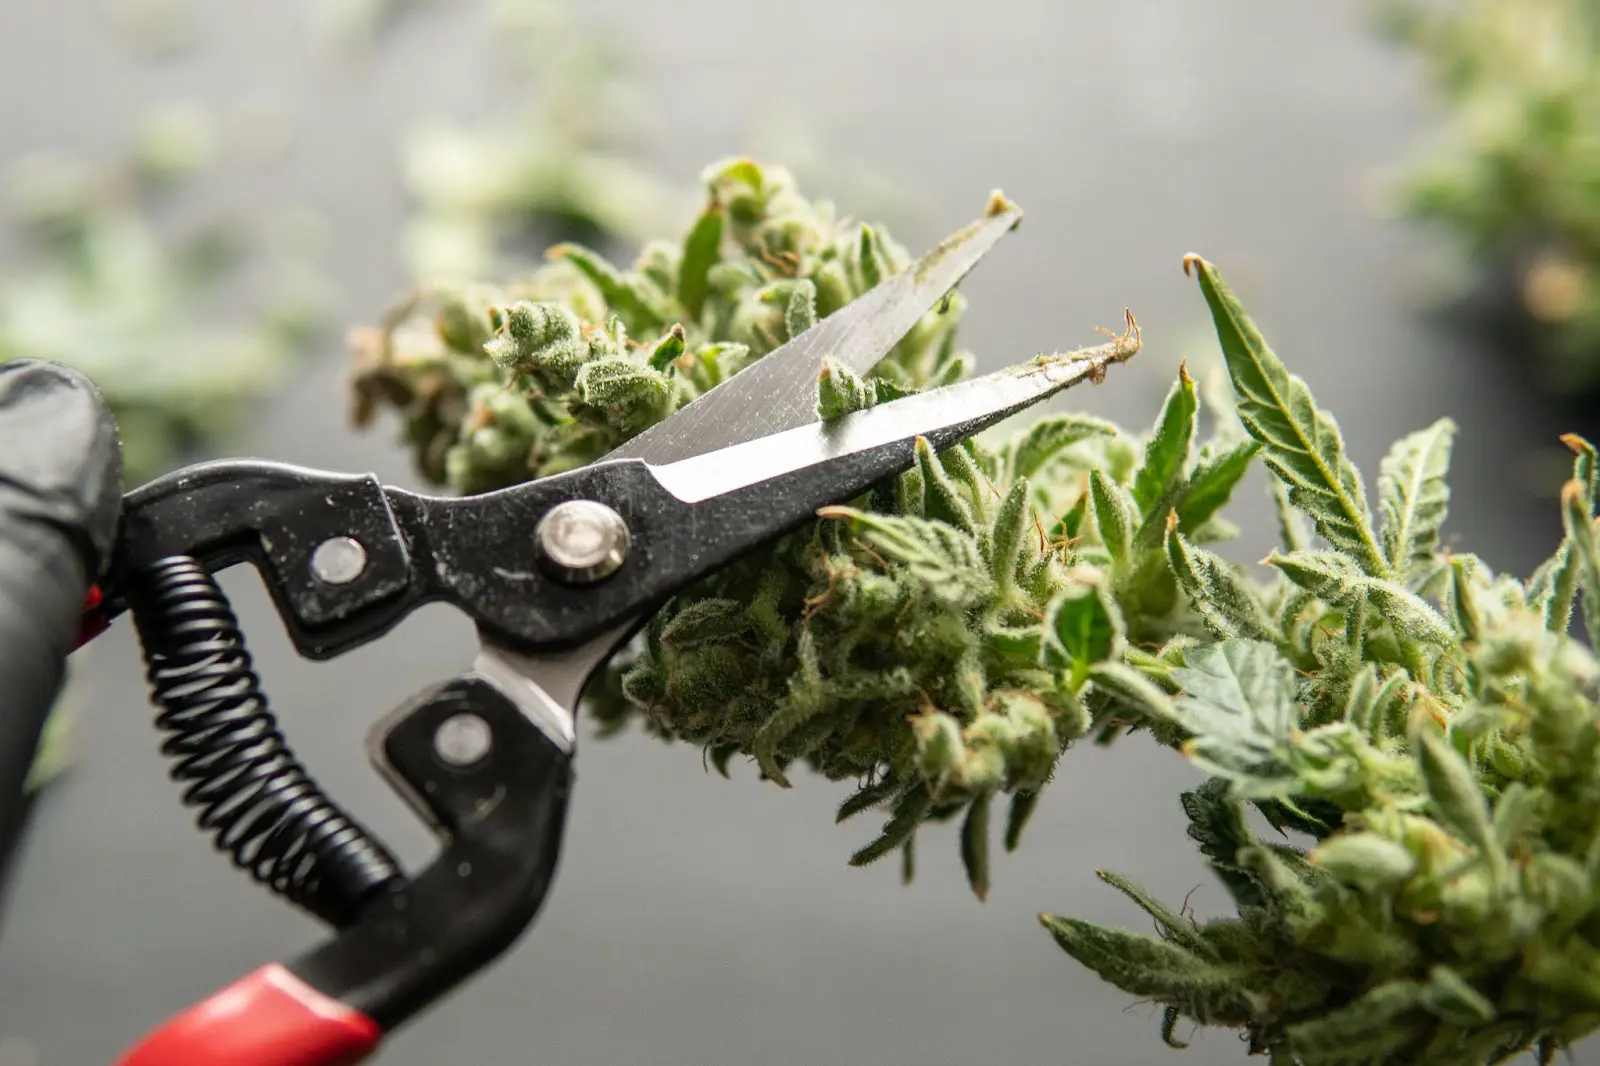
Trimming scissors and isopropyl alcohol
Purpose: To trim your cannabis plant and clean scissors to prevent contamination.
Importance: Properly trimmed buds improve airflow during drying and reduce the risk of mould growth.
Tips: Invest in high-quality trimming scissors with sharp blades for precise cuts. Clean the sticky residue from the scissors with isopropyl alcohol between uses to sterilise and prevent cross-contamination.
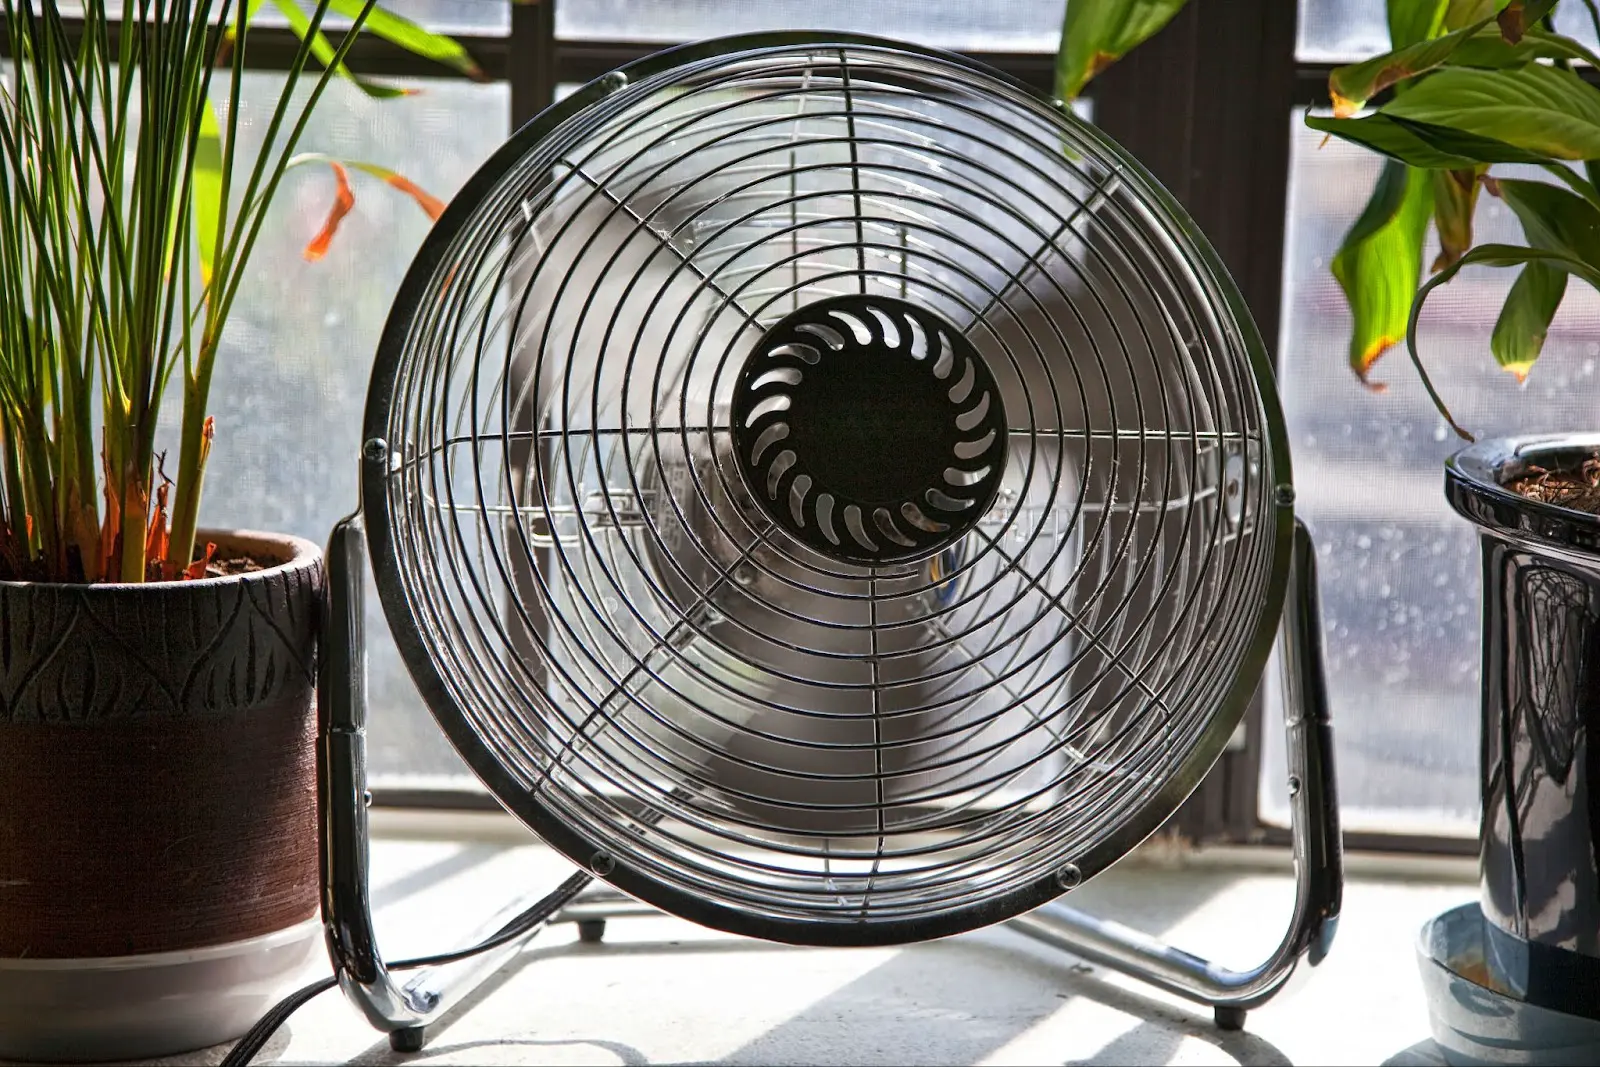
Fan
Purpose: Ensure consistent air circulation in the drying space.
Importance: Gentle airflow helps remove moisture from the plant material and prevents the development of harmful microorganisms.
Tips: Position the fan to circulate air evenly throughout the drying room without directly blowing on the individual buds. Oscillating fans are ideal for promoting uniform drying.
By gathering these essential tools, you can set yourself up for success. Whether purchased from stores or improvised with household items, having the right equipment is essential for producing high-quality cannabis products.
Discover the best growing tips – sign up for the Grow The Best newsletter!
Setting up your drying space to dry cannabis
Creating the ideal drying environment to dry fresh cannabis is essential for preserving the quality and potency of your harvest. Here's how beginners can set up their space to dry cannabis for optimal results:
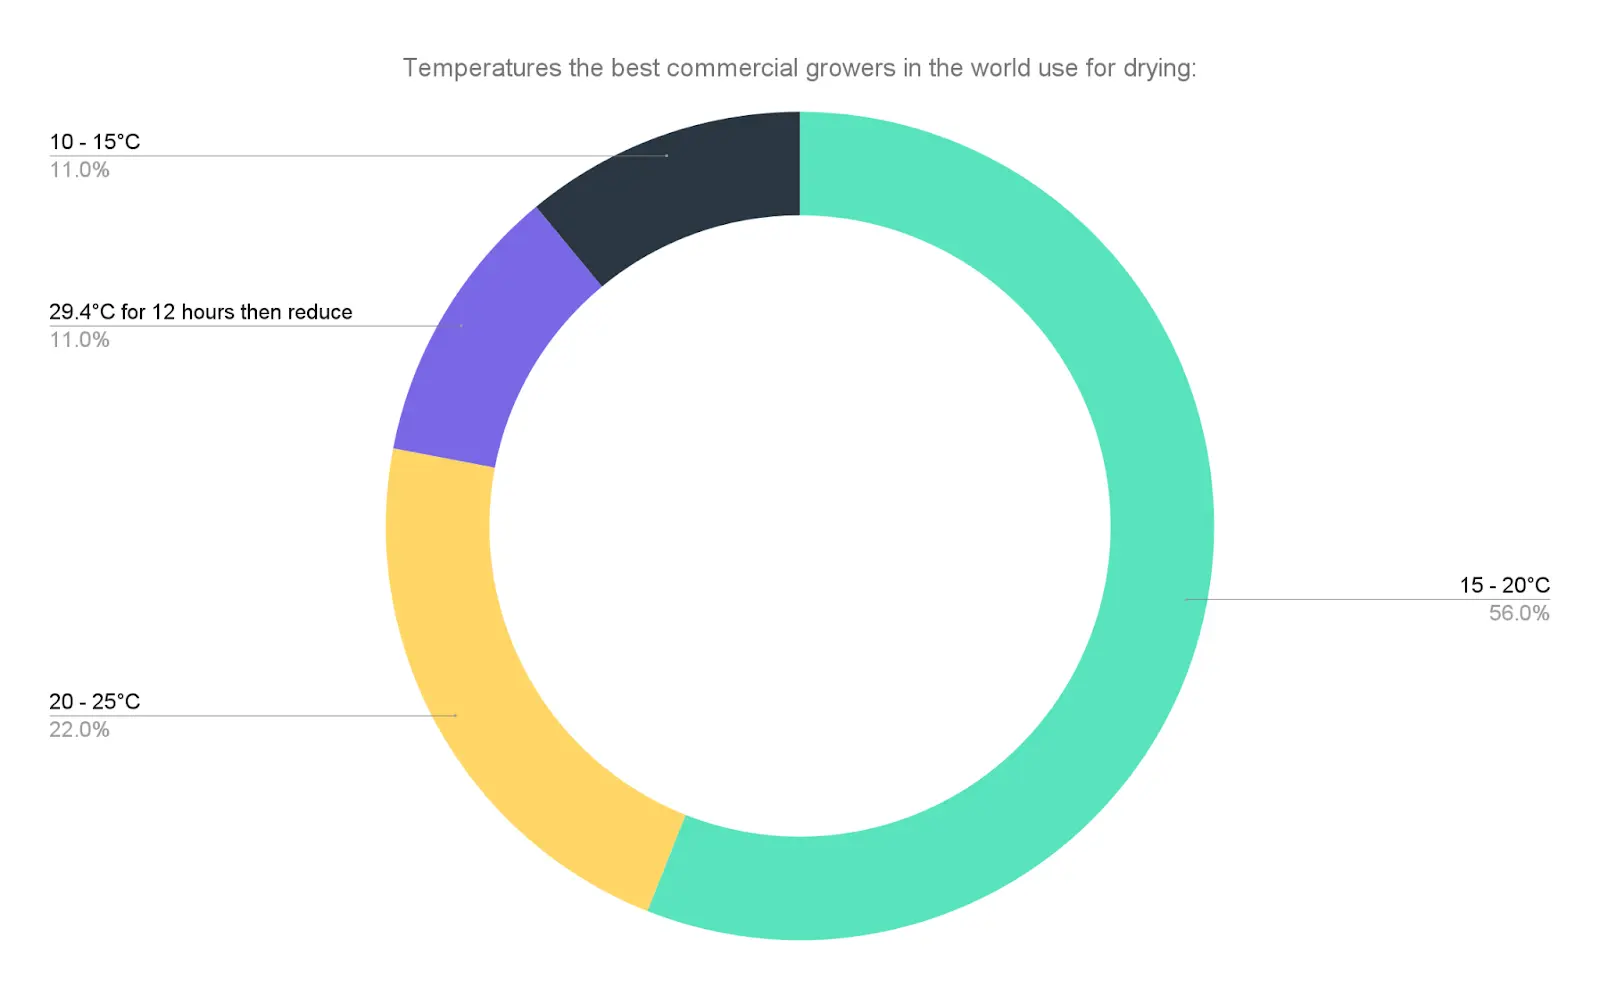
Temperature: Choose a location with consistent temperatures between 15°C and 20°C (60°F - 70°F) or an area where you can control temperature, like a grow tent. Avoid areas prone to extreme temperature fluctuations, such as attics or garages, which can impact drying times and quality.
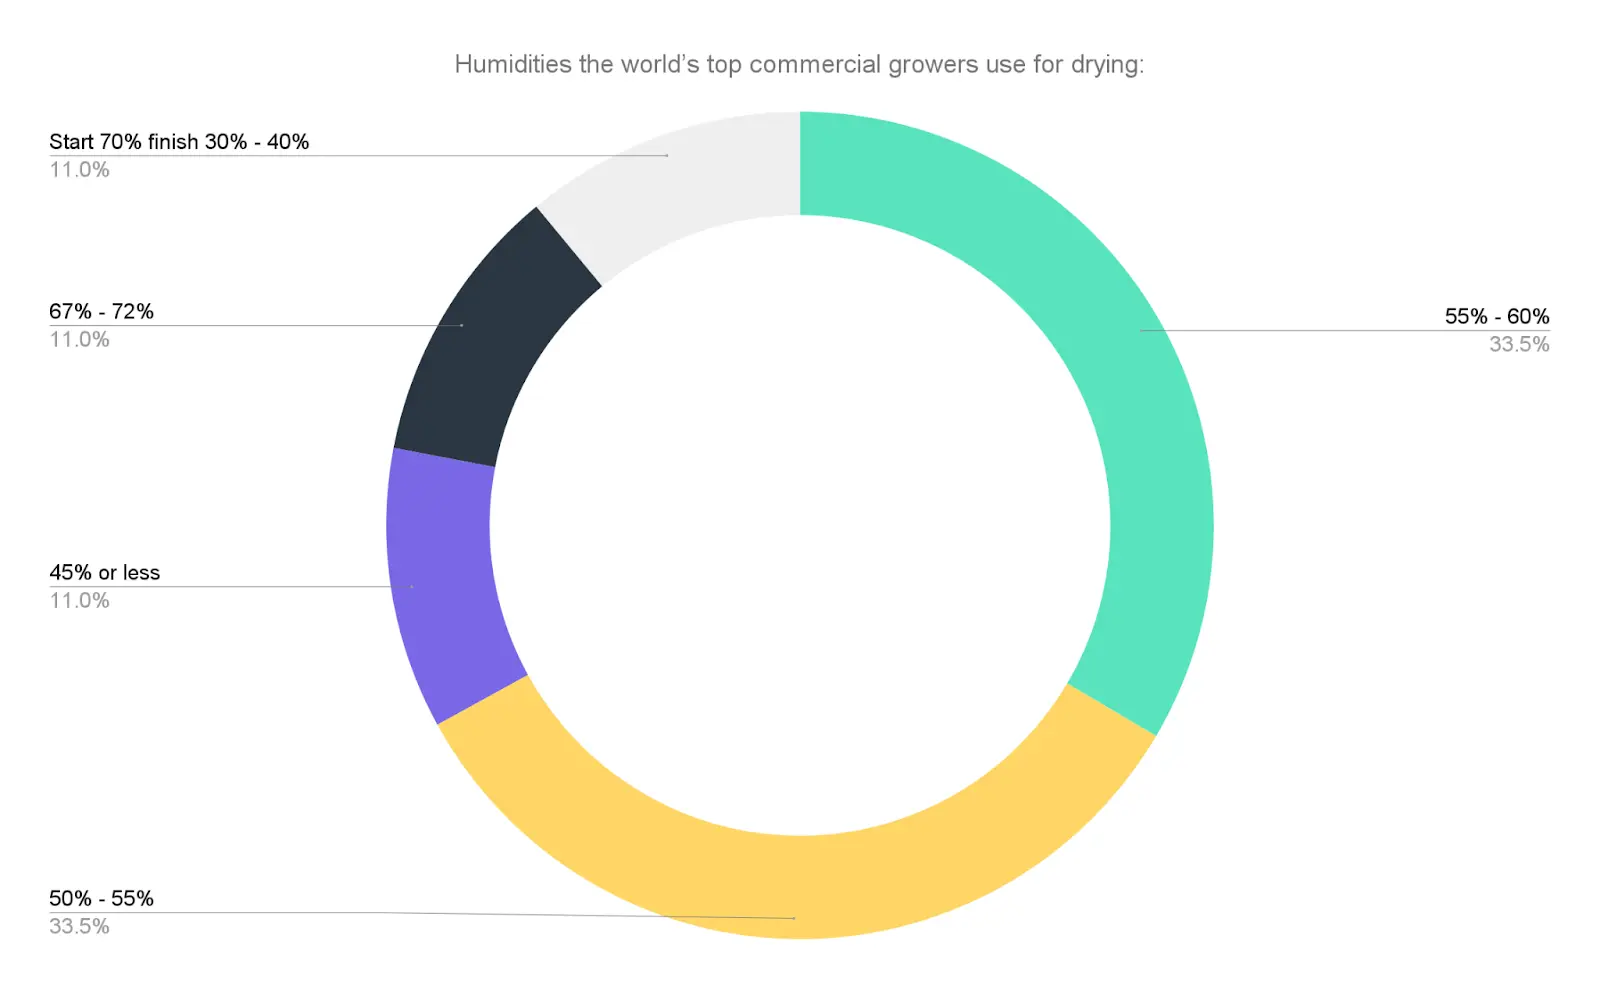
Humidity: To prevent mould and mildew growth, aim for a relative humidity of 50% and 60%. Spaces with high moisture, such as basements, may require additional dehumidification measures.
Airflow: Ensure adequate air circulation to promote even drying. Avoid enclosed spaces with limited airflow, which can lead to stagnant conditions and moisture buildup.
Ventilation: Establish proper ventilation to maintain fresh air circulation throughout the drying room. Use exhaust fans or open windows to remove stale air and prevent odour accumulation.
Light exposure: Keep the drying area dimly lit or shielded from direct sunlight to prevent the degradation of cannabinoids and terpenes. Excessive light exposure can lead to loss of potency and undesirable changes in flavour and aroma.
Cleanliness: Keep the area space clean and free from debris, dust, and pests. Regularly sweep or vacuum the area and disinfect surfaces to prevent contamination and maintain hygienic conditions.
By selecting an appropriate location and implementing proper ventilation, lighting, and cleanliness measures, you can create an optimal drying environment to preserve the quality and integrity of your fresh cannabis harvest.
Harvesting and preparing for drying
Before embarking on drying cannabis, it's crucial to harvest your plants at the right time and prepare them properly. Here are the best practices for harvesting and pre-drying preparations:
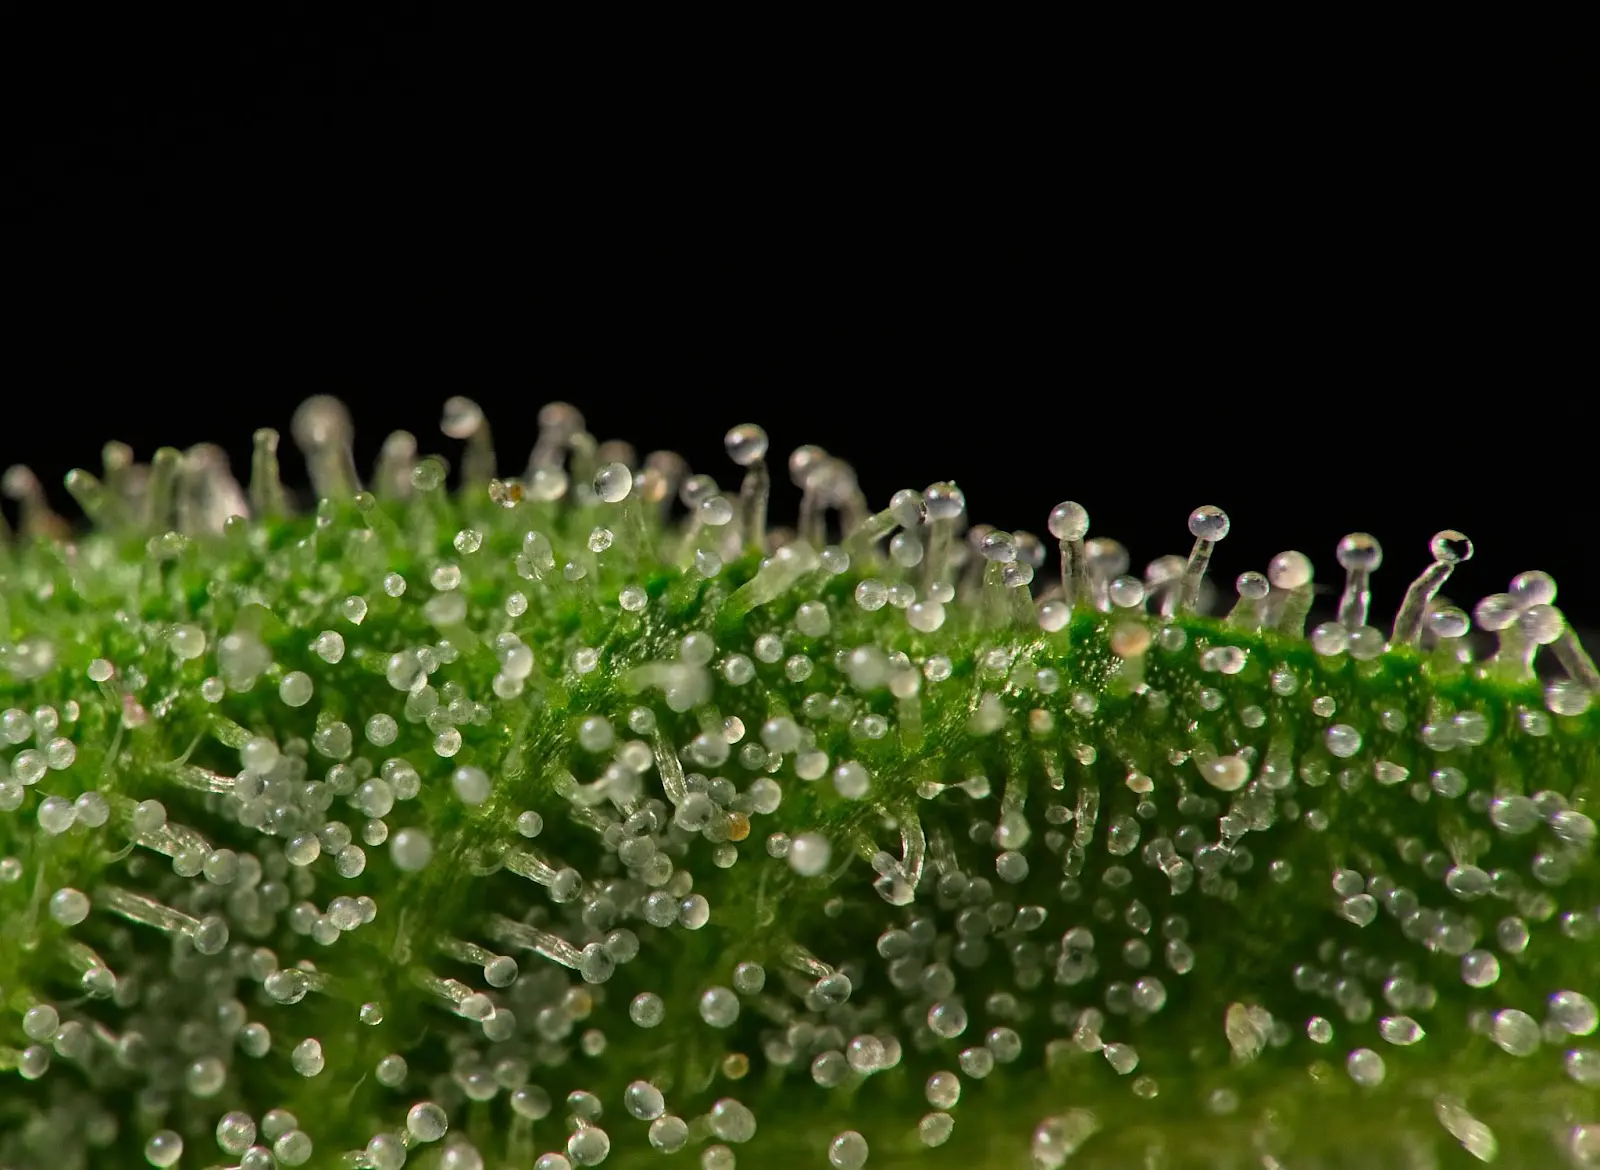
Timing: Most growers harvest a cannabis plant when the majority of trichomes have turned cloudy or amber in colour. Avoid harvesting too early, as this can result in underdeveloped buds with lower potency.
Removing excess foliage: Some people like to hang the entire plant to dry, but drying a whole plant is risky. We recommend carefully trimming away any remaining leaves and branches that could impede airflow or collect moisture before hanging your harvested plants to dry. Focus on creating a clean, uniform appearance to facilitate even drying.
Trimming technique: Use sharp, clean trimming scissors to remove large fan leaves and excess foliage from the harvested plants. Break a plant down into branches and trim individual buds, leaving a small amount of stem attached for handling. This will allow the plant material to dry more quickly than if you hung the whole plant.
Handling delicate buds: Carefully handle the buds to avoid damaging the delicate trichomes and resin glands. Avoid excessive touching or squeezing, which can lead to trichome loss and decreased potency. Use gentle handling techniques to preserve the integrity of the buds.
By following these harvesting best practices and pre-drying preparations, you can ensure that your cannabis plants are primed for optimal results.
Wet trimming or dry trimming?
When it comes to harvesting cannabis, cultivators have the option to wet trim or dry trim their buds.
Wet trimming removes excess foliage and sugar leaves from freshly harvested plants before drying. This method is typically done within 2 days after harvest when the plant material is still moist.
Trimming wet can result in cleaner, more aesthetically pleasing buds and may reduce the risk of mould during drying. However, it requires more time and effort than dry trimming.
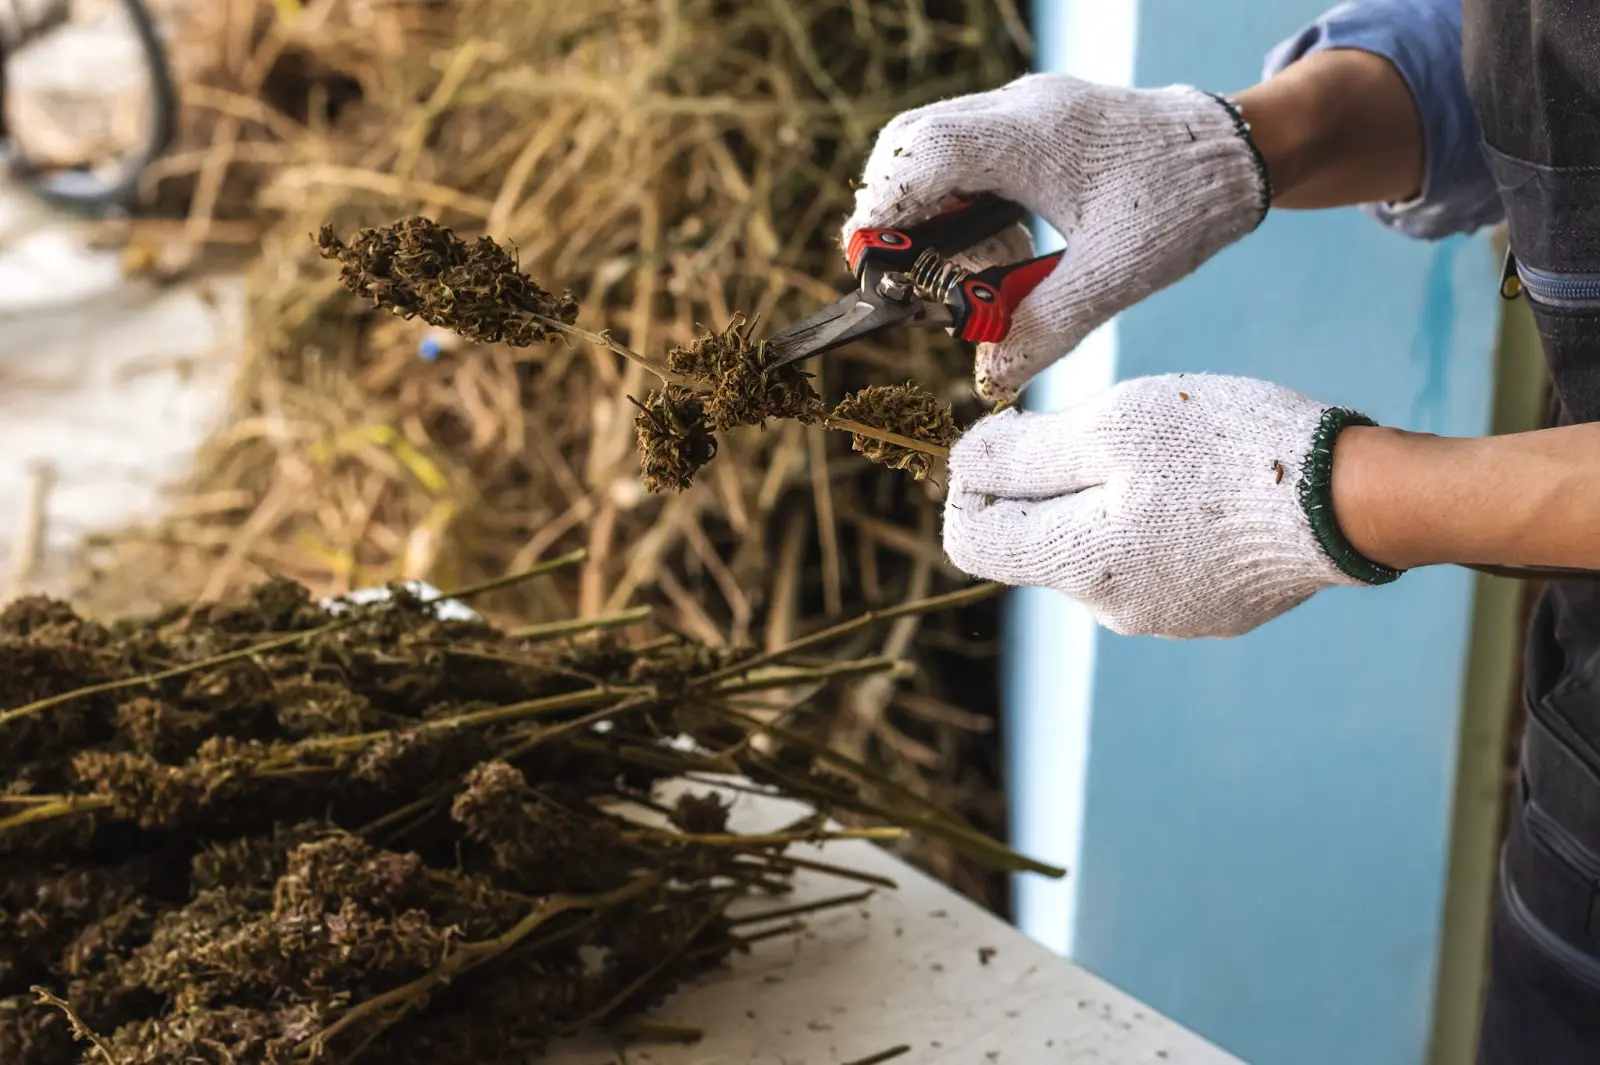
On the other hand, dry trimming involves trimming buds after they have been dried and keeping some of the sugar leaves. This method is usually performed after 10 days of drying when the buds are still slightly moist but no longer wet.
Dry trimming is faster and less labour-intensive than wet trimming, as the dried leaves are easier to handle and trim. However, it may result in slightly less visually appealing buds than wet trimming.
Ultimately, the choice between wet trimming and dry trimming comes down to personal preference.
Some growers prefer the precision and cleanliness of wet trimming, while others opt for the efficiency and convenience of dry trimming.
The drying process: Step-by-step guide
For beginners, mastering the drying process is essential to preserving the quality of your cannabis harvest. Here's a detailed step-by-step guide to help you navigate drying effectively:
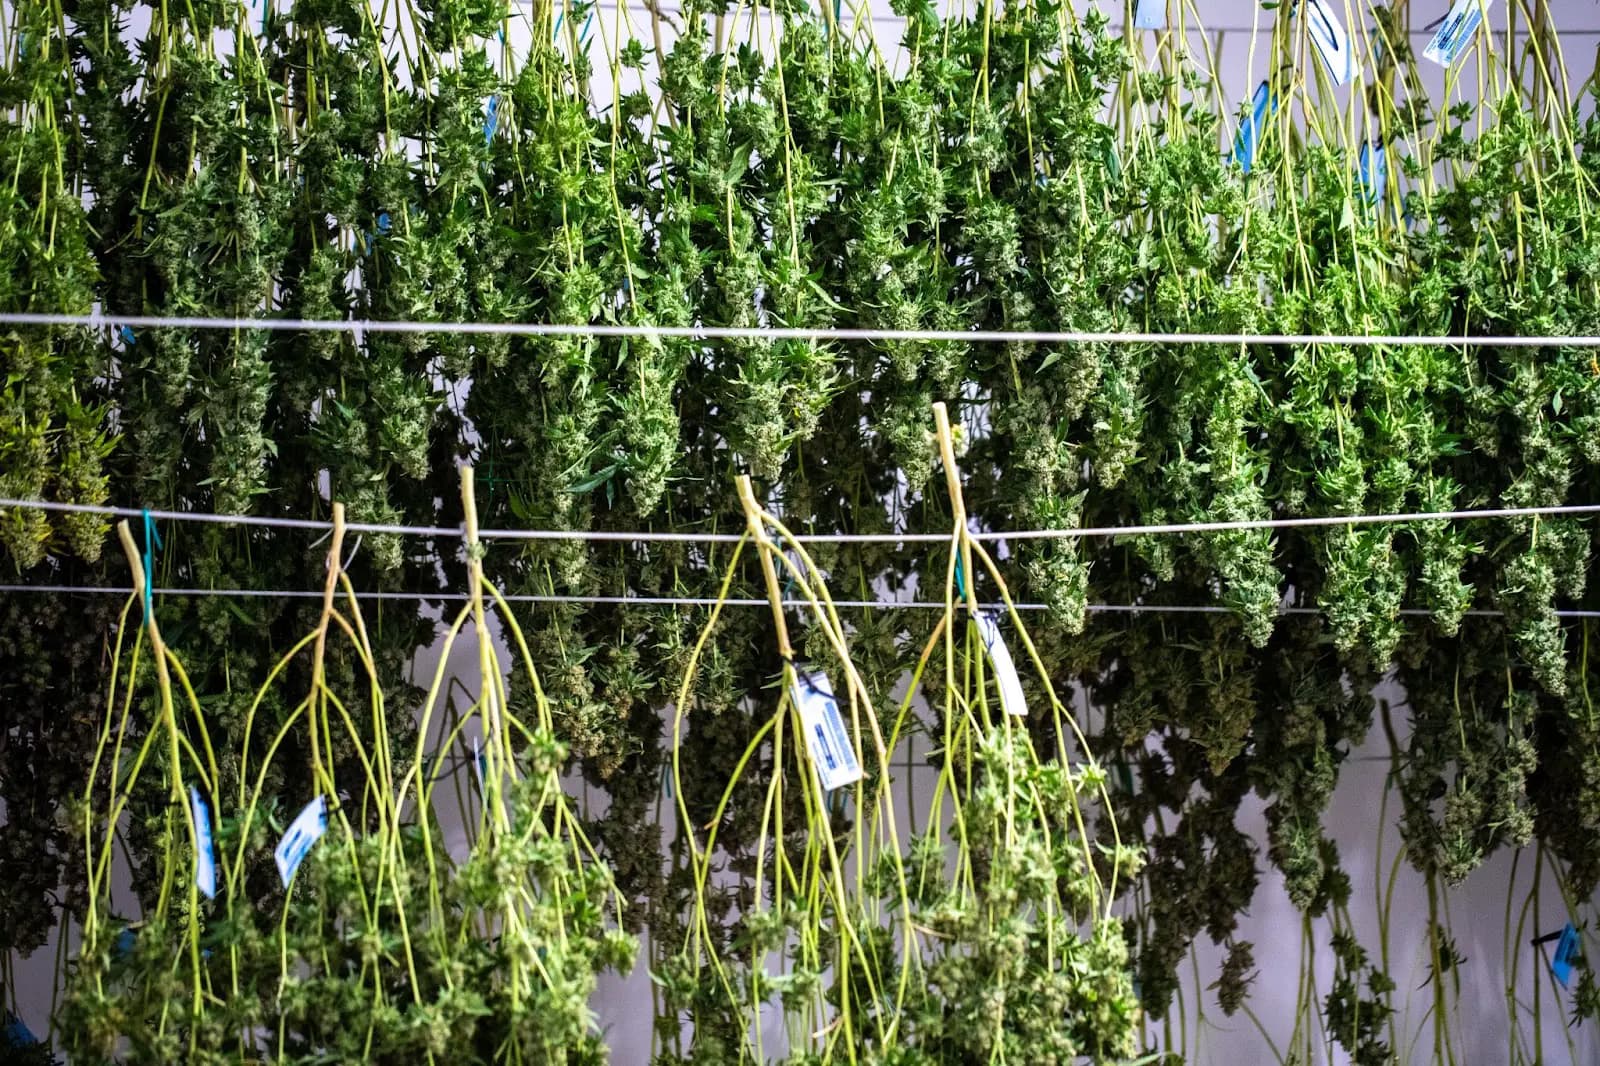
Cutting down plants and hanging them to dry
After harvesting your cannabis plants, carefully trim away excess foliage and large fan leaves using sharp scissors or trimming tools.
Hang buds upside down on drying racks or strings in a well-ventilated, dark room. Ensure that as buds dry, there is ample space between each plant for proper airflow.
Maintaining ideal conditions
Temperature: During the initial drying phase, keep the drying room temperature consistent at between 15°C and 20°C (60°F - 70°F) using a heater or air conditioner if necessary. Avoid drastic temperature fluctuations, as these can impact the quality of the end product.
Humidity: In the drying room, maintain a relative humidity level of approximately 50% and 60%. Use a hygrometer or environmental sensor to monitor humidity levels and adjust as needed.
Air circulation: Use fans on a low setting to ensure adequate airflow around the drying plants. Avoid direct airflow onto the buds, as this can dry cannabis too quickly.
Common Mistakes to Avoid During Drying
- Rapid drying: Avoid drying your cannabis too quickly, as this can result in harsh-tasting buds with diminished potency. Aim for a slow and gradual drying process to preserve the flavour and aroma of the final product.
- Excessive handling: To prevent damage to the delicate trichomes and resin glands, minimise handling of the drying plants. Handle the buds gently, and avoid squeezing or compacting them.
- Poor air circulation: Ensure sufficient airflow around the drying plants to prevent the development of mould and mildew. Position fans strategically to promote even airflow throughout the drying room.
By following this step-by-step guide and avoiding common pitfalls, you can achieve optimal drying results and produce high-quality cannabis buds with enhanced flavour, potency, and overall user experience.
The curing process:
Curing properly is a crucial step in the cannabis cultivation process that significantly enhances the flavour, potency, and overall quality of your harvest.
Curing buds involves storing them in a controlled environment for an extended period, typically several weeks to months. This is called a slow cure.
The primary reason to cure buds is to break down the chlorophyll. It also further develops and refines their aroma, flavour, and smoothness, resulting in a more enjoyable smoking or vaping experience.
When you cure cannabis, it also helps to enhance the potency of the cannabinoids present in the buds, allowing for a more potent and effective cannabis product.
Step-by-step guide to curing:
- Transitioning from drying to curing: Once you’ve let your buds dry to the desired moisture content, it's time to transition to the curing phase.
- Storing in containers: Transfer the dried buds into an airtight container, such as a glass mason jar, for the curing process. Fill the jars to around 75% capacity to allow for air circulation.
- Sealing the containers: Ensure that the containers you’ve chosen to store and cure buds in are tightly sealed to create a controlled microclimate inside. This helps to maintain optimal humidity for proper curing.
- Burping the jars: During the initial stage of curing, open the jars to burp the buds regularly. Once or twice a day is ideal to release moisture built up in the jars and exchange stale air with fresh air. This process helps to prevent moldy buds and mildew growth.
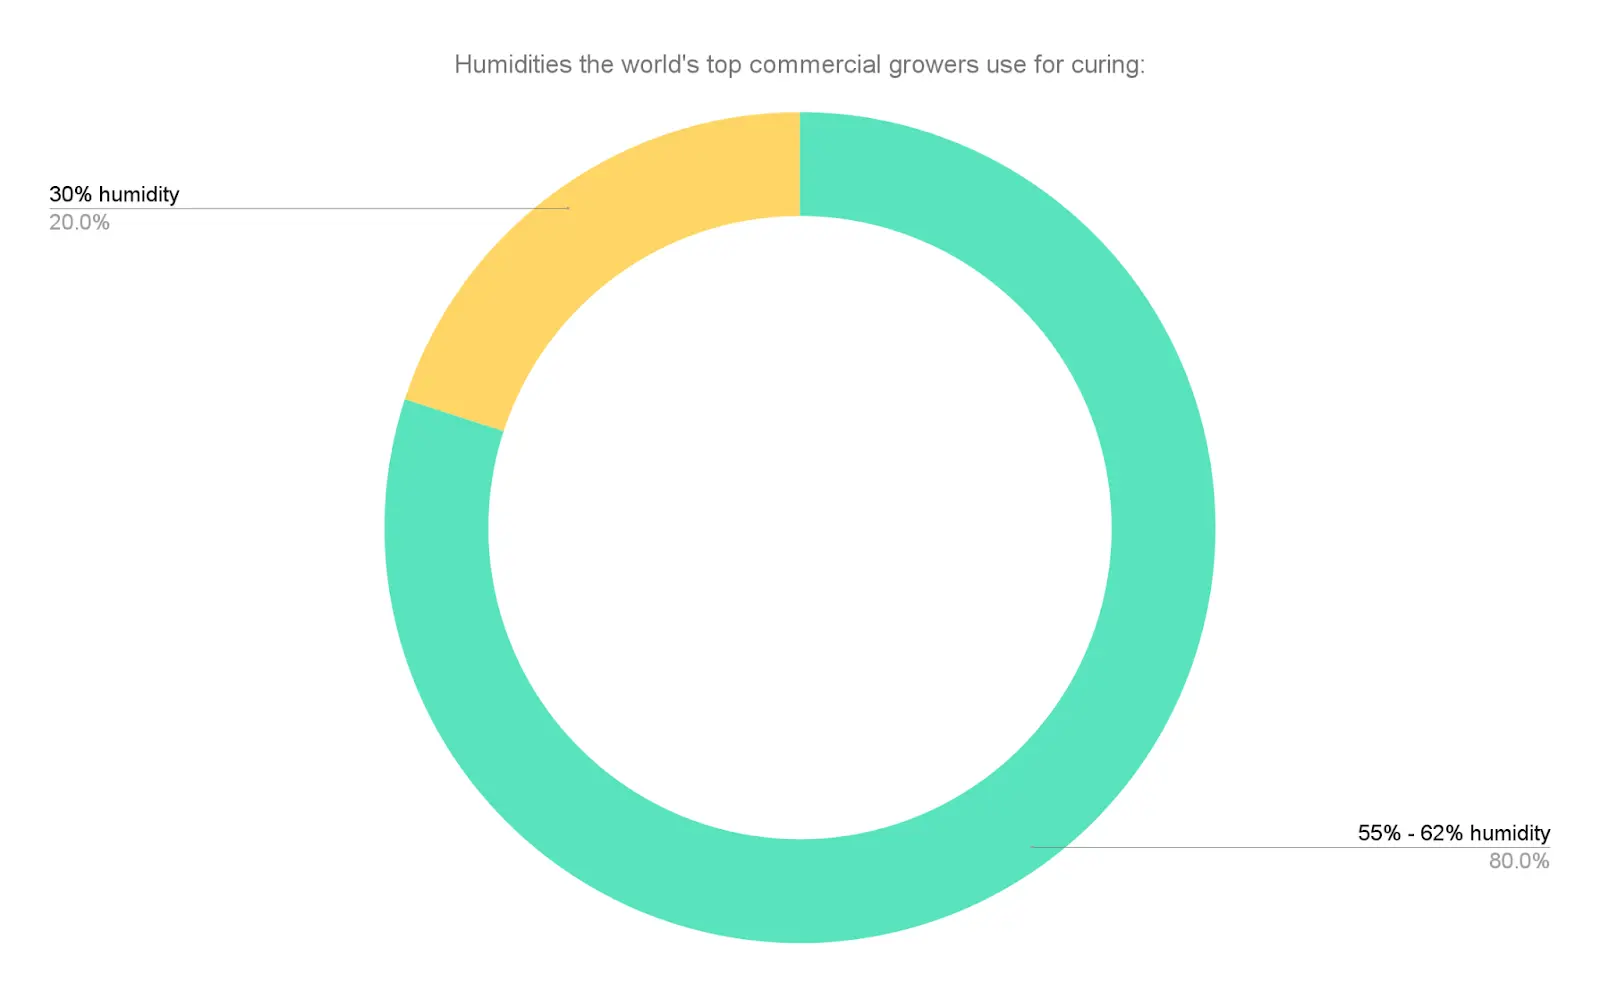
- Monitoring and adjusting humidity: Use a hygrometer or humidity monitor to track the relative humidity (RH) of the curing jars. The ideal humidity level for curing is around 55%.
If the humidity is too high, leave the jars open for longer periods to allow undesirable moisture to escape. If the humidity levels are too low for a proper cure, consider adding a humidity pack or a small piece of moistened paper towel to the jars to increase the humidity.
By following these steps and carefully monitoring humidity, you can master the art of curing and unlock the full flavour, potency, and enjoyment potential of your cannabis harvest.
Never, under any circumstances, should you consider skipping curing! Cure for at least two weeks because, like a fine wine, cannabis gets better with time.
Troubleshooting common issues
Even with careful attention to detail, beginners may encounter common issues during drying and curing. Let's address these challenges and provide practical solutions to overcome them:
Mould and mildew
Problem: If you can smell ammonia, that means that anaerobic bacteria are present and feasting on your buds, causing them to mold and rot. Look out for fuzzy white or green spots on your buds accompanied by a musty odour. Mold and mildew thrive in warm, humid environments.
Solution: Immediately remove any affected moldy buds and inspect surrounding areas for signs of contamination. Lower humidity and increase air circulation to prevent further mold growth. Consider using a dehumidifier or air purifier to maintain optimal conditions.
Excess moisture
Symptoms: Buds may feel damp or spongy to the touch, indicating excessive moisture content. This can lead to mold growth and degradation of quality.
Solution: Remove buds from storage jars (or plastic bags if that’s what you initially used) and allow them to air dry in a well-ventilated area. Monitor the humidity and avoid sealing jars until moisture levels have normalised. If necessary, use desiccant packs or rice grains to absorb excess moisture.
Overdrying
Problem: Dry, brittle buds that crumble easily suggest overexposure to air and insufficient moisture content. Overdrying can diminish flavour and aroma.
Solution: Rehydrate buds by placing them in a sealed container with a humidity pack or fresh citrus peel. Monitor moisture levels closely and check for signs of rehydration. Avoid prolonged exposure to moisture to prevent mould growth.
Fluctuating temperature and humidity
Issue: Inconsistent environmental conditions can impact the quality and stability of your stored cannabis. Fluctuations in temperature and humidity levels may accelerate degradation.
Solution: Invest in climate-controlled storage solutions, such as electronic humidors or wine coolers, to maintain stable conditions. Regularly monitor temperature and humidity and make adjustments as needed. Avoid storing cannabis in areas prone to temperature fluctuations, such as attics or garages.
Oxygen exposure
Problem: Exposure to oxygen can degrade cannabinoids and terpenes over time, leading to a loss of potency and flavour.
Solution: Vacuum-seal storage jars or use oxygen-absorbing packets to remove excess oxygen and maintain freshness. Store jars in an airtight container to minimise oxygen exposure and extend the shelf life of your cannabis.

Poor aroma and flavour
Issue: Improper drying or curing techniques can result in a loss of aromatic compounds and flavour complexity.
Solution: Optimize drying and curing conditions to preserve terpenes and cannabinoids. Use a slow, gradual drying process followed by a lengthy curing period to enhance aroma and flavour.
Experiment with different curing methods, such as glass jar curing or paper bag curing, to find the optimal approach for your cannabis.
Poor trimming
problem: Excessively leafy or poorly trimmed buds may contain unwanted plant material, affecting overall quality and appearance.
Solution: Trim buds thoroughly before storage, removing excess leaves and stems. Use sharp, clean scissors or trimming tools to achieve a clean, uniform appearance. Proper trimming enhances bud density and concentrates cannabinoid content.
By addressing these common issues promptly and effectively, you can maintain the quality and integrity of your cured cannabis, ensuring a satisfying and enjoyable experience for consumption.
Remember, patience and vigilance are essential to successful troubleshooting during the drying and curing process.
Long-term storage techniques
Preserving the quality of cured cannabis is essential for maintaining its freshness, potency, and overall appeal over time. Here are some recommendations for long-term storage to ensure your hard-earned harvest stays fresh:
Airtight containers
To store buds once cured, choose high-quality glass jars with airtight seals. Mason jars are a popular choice due to their durability and seal effectiveness.
Avoid plastic containers, as they can introduce unwanted odours and flavours to your cannabis. Stick to glass for the best results.
Proper labelling
Label each jar with the strain name and harvest date to keep track of your inventory. This helps you identify different strains and track their ageing process.
Note any details about the curing process or flavour profile for future reference. This information enhances your understanding of each batch's unique characteristics.
Environmental factors
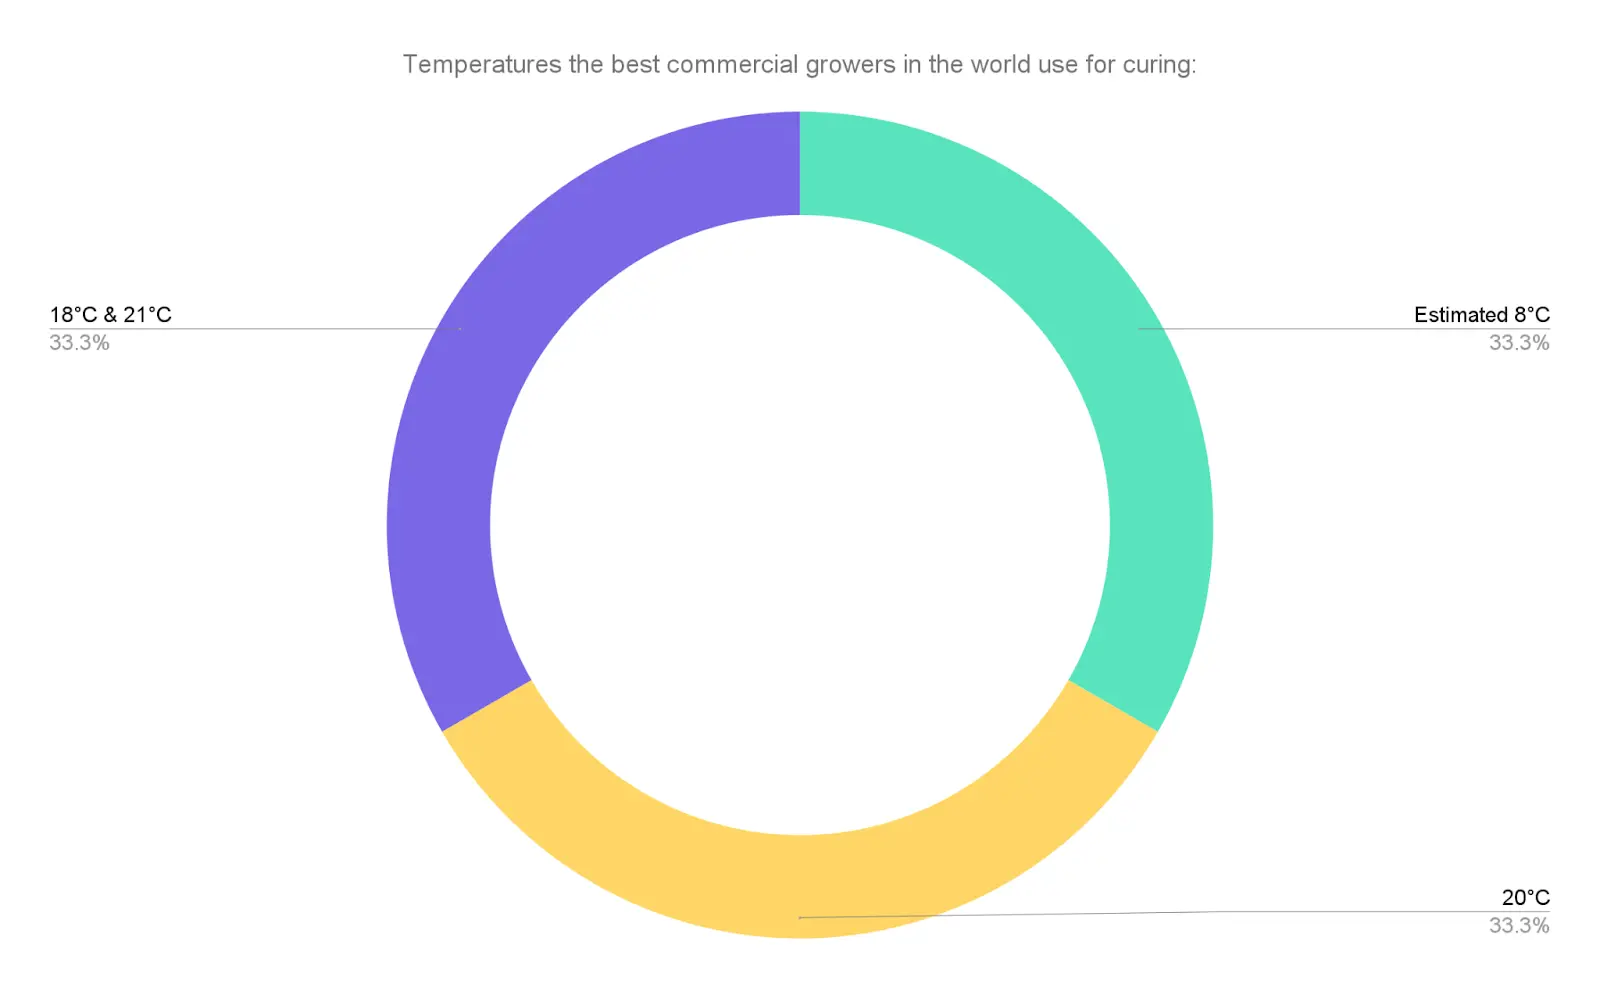
Store your jars in a cool, dark place to minimise exposure to light and heat. Keep temperatures to under 21°C (70°F) - the cooler the betteris ideal for maintaining freshness and potency.
Avoid direct sunlight, as exposure to UV rays can degrade cannabinoids and terpenes, leading to a loss of potency and flavour.
Humidity control
Aim for a relative humidity level of around 55% to 62% inside the storage jars. Too much moisture can promote mould growth, while too little can cause the buds to dry out.
Use humidity packs or humidity control devices to regulate moisture levels inside the jars and maintain optimal humidity conditions.
FIFO
Practice FIFO (First In, First Out) rotation to ensure you consume older cannabis before newer batches. This helps maintain freshness and prevents the accumulation of stale inventory.
Regularly inspect your stored cannabis for any signs of mould, mildew, or degradation. Remove any compromised buds immediately to prevent further contamination.
Minimal handling
Avoid excessive handling of the buds, as this can lead to trichome damage and a loss of potency. Use clean, dry hands or gloves when accessing your stored cannabis to preserve its quality.
Temperature and humidity monitoring
Use a hygrometer to monitor temperature and humidity inside the storage jars. Make adjustments as needed to maintain optimal conditions and ensure the longevity of your cannabis.
By implementing these long-term storage techniques, you can prolong the shelf life of your cured cannabis and enjoy premium-quality buds for months or even years to come.
To effectively preserve freshness and potency, remember to maintain airtight conditions, monitor environmental factors, and practice proper inventory management.
Takeaways
Mastering the art of drying and curing cannabis is crucial for beginners looking to unlock the full potential of their harvest. Here are the key takeaways from our guide:
Proper drying and curing are essential steps in cannabis cultivation that significantly impact the flavour, potency, and overall quality of the final product. By paying attention to these processes, you can elevate your cannabis cultivation game and produce premium-quality buds.
We've provided you with practical tips and techniques for every step of the drying and curing process, from setting up the drying space to troubleshooting common issues. By applying these insights, you can confidently navigate the process and achieve superior results.
Take your curing and drying practices to the next level. With patience, attention to detail, and a commitment to quality, you can cultivate high-quality cannabis that rivals commercial-grade products.
Embrace the journey of learning and experimentation in drying and curing cannabis. By following our guide and applying the knowledge gained, you can embark on a rewarding and fulfilling experience in cannabis cultivation.
Happy growing!
FAQs
Do you dry or cure first?
You typically dry the cannabis first before moving on to the cure cannabis.
Is it better to trim buds wet or dry?
Dry trimming is generally better than wet trimming, as it's easier to handle and trim dry buds.
Should buds be completely dry before curing?
No, buds should not be completely dry before curing. They should be dried to a certain level where the exterior feels dry, but the stems still have some flexibility.
What is the perfect drying and curing?
The perfect drying and curing process involves maintaining optimal temperature, humidity, and airflow to preserve the flavour, potency, and overall quality of the cannabis buds.
How do you tell if buds are dry enough for curing?
Dry buds are ready to cure when the smaller stems snap easily, but the thicker stems still bend without breaking.
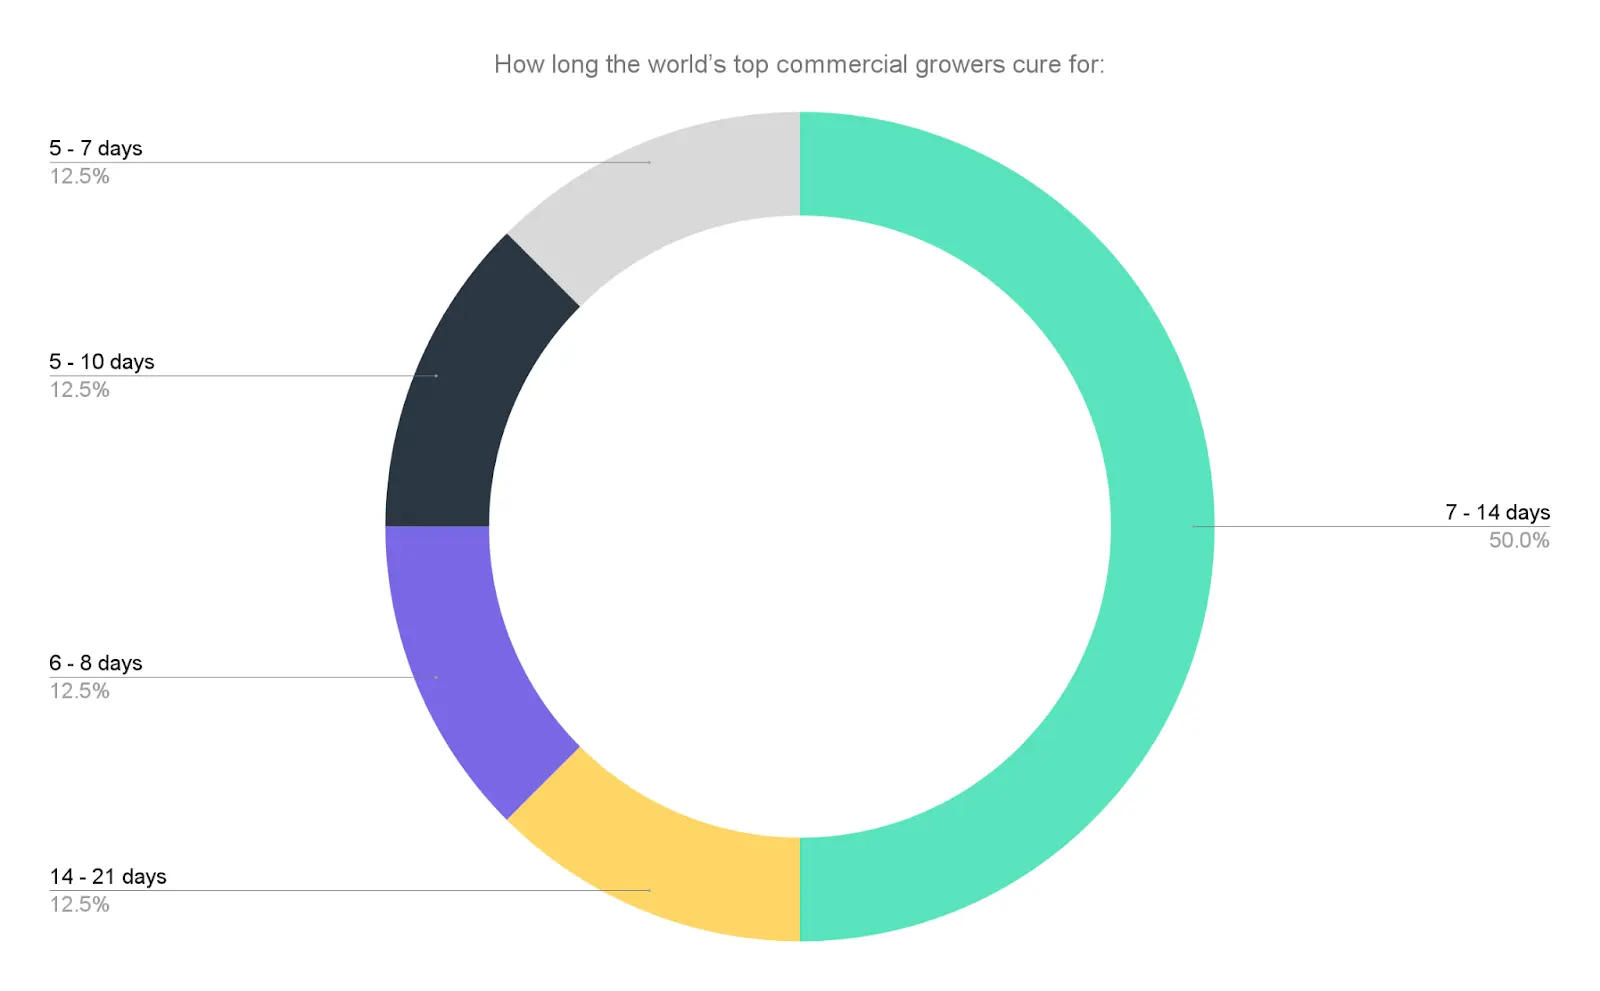
How long to dry buds before jarring?
Buds should typically dry for around 7-14 days before jarring, depending on factors like humidity and airflow.
Should buds be sticky after drying?
Buds can still be slightly sticky after drying but should not feel wet or overly moist.
What happens if you dry your buds too long?
If you dry your buds for too long, they can become overly dry and brittle, reducing their potency and flavour.
Can you trim buds before drying?
Yes, you can trim individual buds before drying to improve airflow and prevent mould growth.
Improve your harvest – join the Grow The Best newsletter today!