Mealybugs are small but mighty pests that can settle on your plants.
If left untreated, they can spell disaster!
As with many aspects of growing plants, pest prevention is a great way to minimise the likelihood of infestations. In turn, this saves wasting time and resources treating mealybug populations in your grow space. Although mealybugs can affect outdoor plants, in this article, we will focus on indoor plants- specifically cannabis.
Let’s learn more about these pests. We are also going to give you some key tips on how to get rid of mealybugs on cannabis grown indoors.
Disclaimer: Any information given on this site is for educational purposes only. Please ensure if you’re growing cannabis, you’re doing so in accordance with the law and subject to appropriate permissions and licenses of the applicable country.
What are mealybugs?
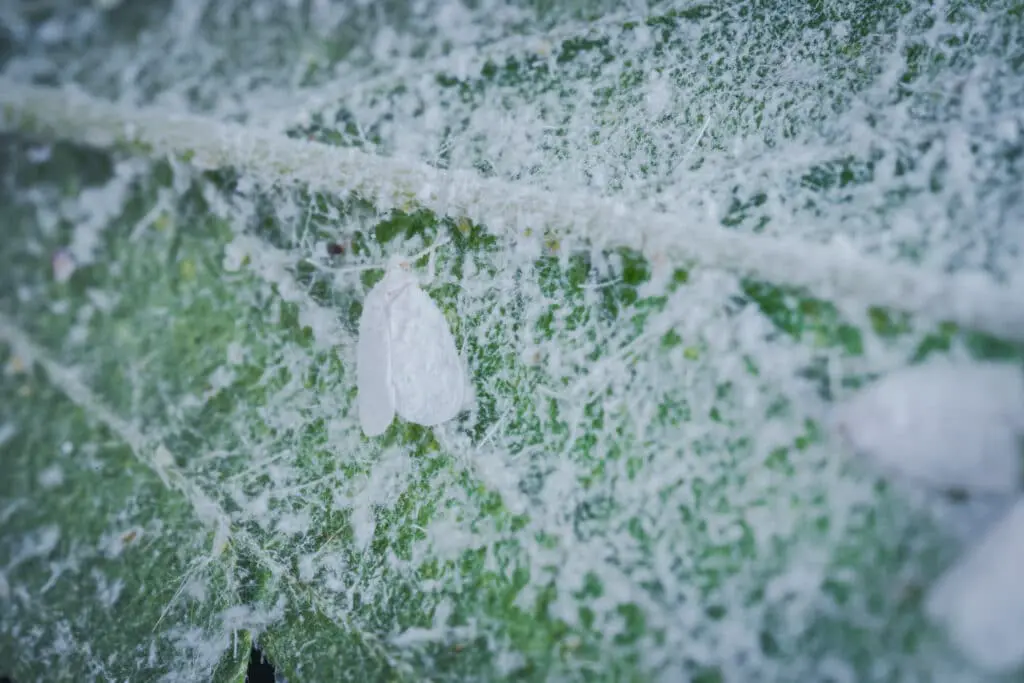
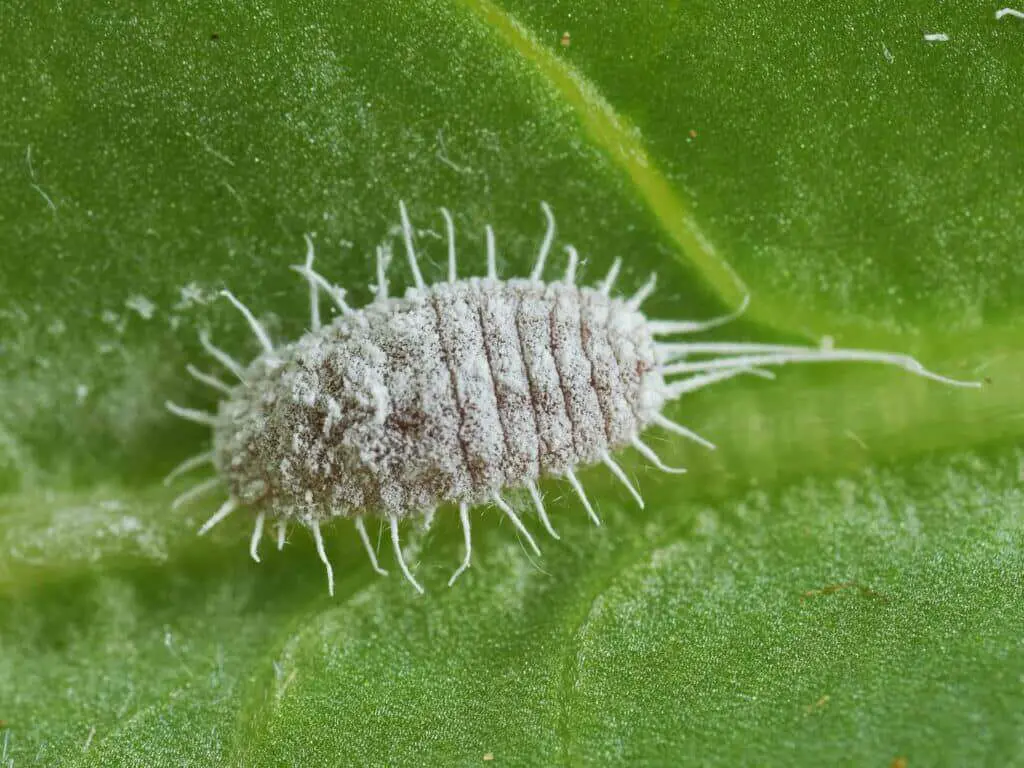
Typically found in warmer climates, mealybugs are small oval-shaped insects. Mealybugs produce a white waxy cotton-like web around themselves. This web protects them from heat and moisture loss- and therefore death!
Mealybugs are part of the scale family, alongside other common greenhouse pests such as aphids and whiteflies.
What do mealybugs look like?
Tiny and sneaky – that’s what they look like!
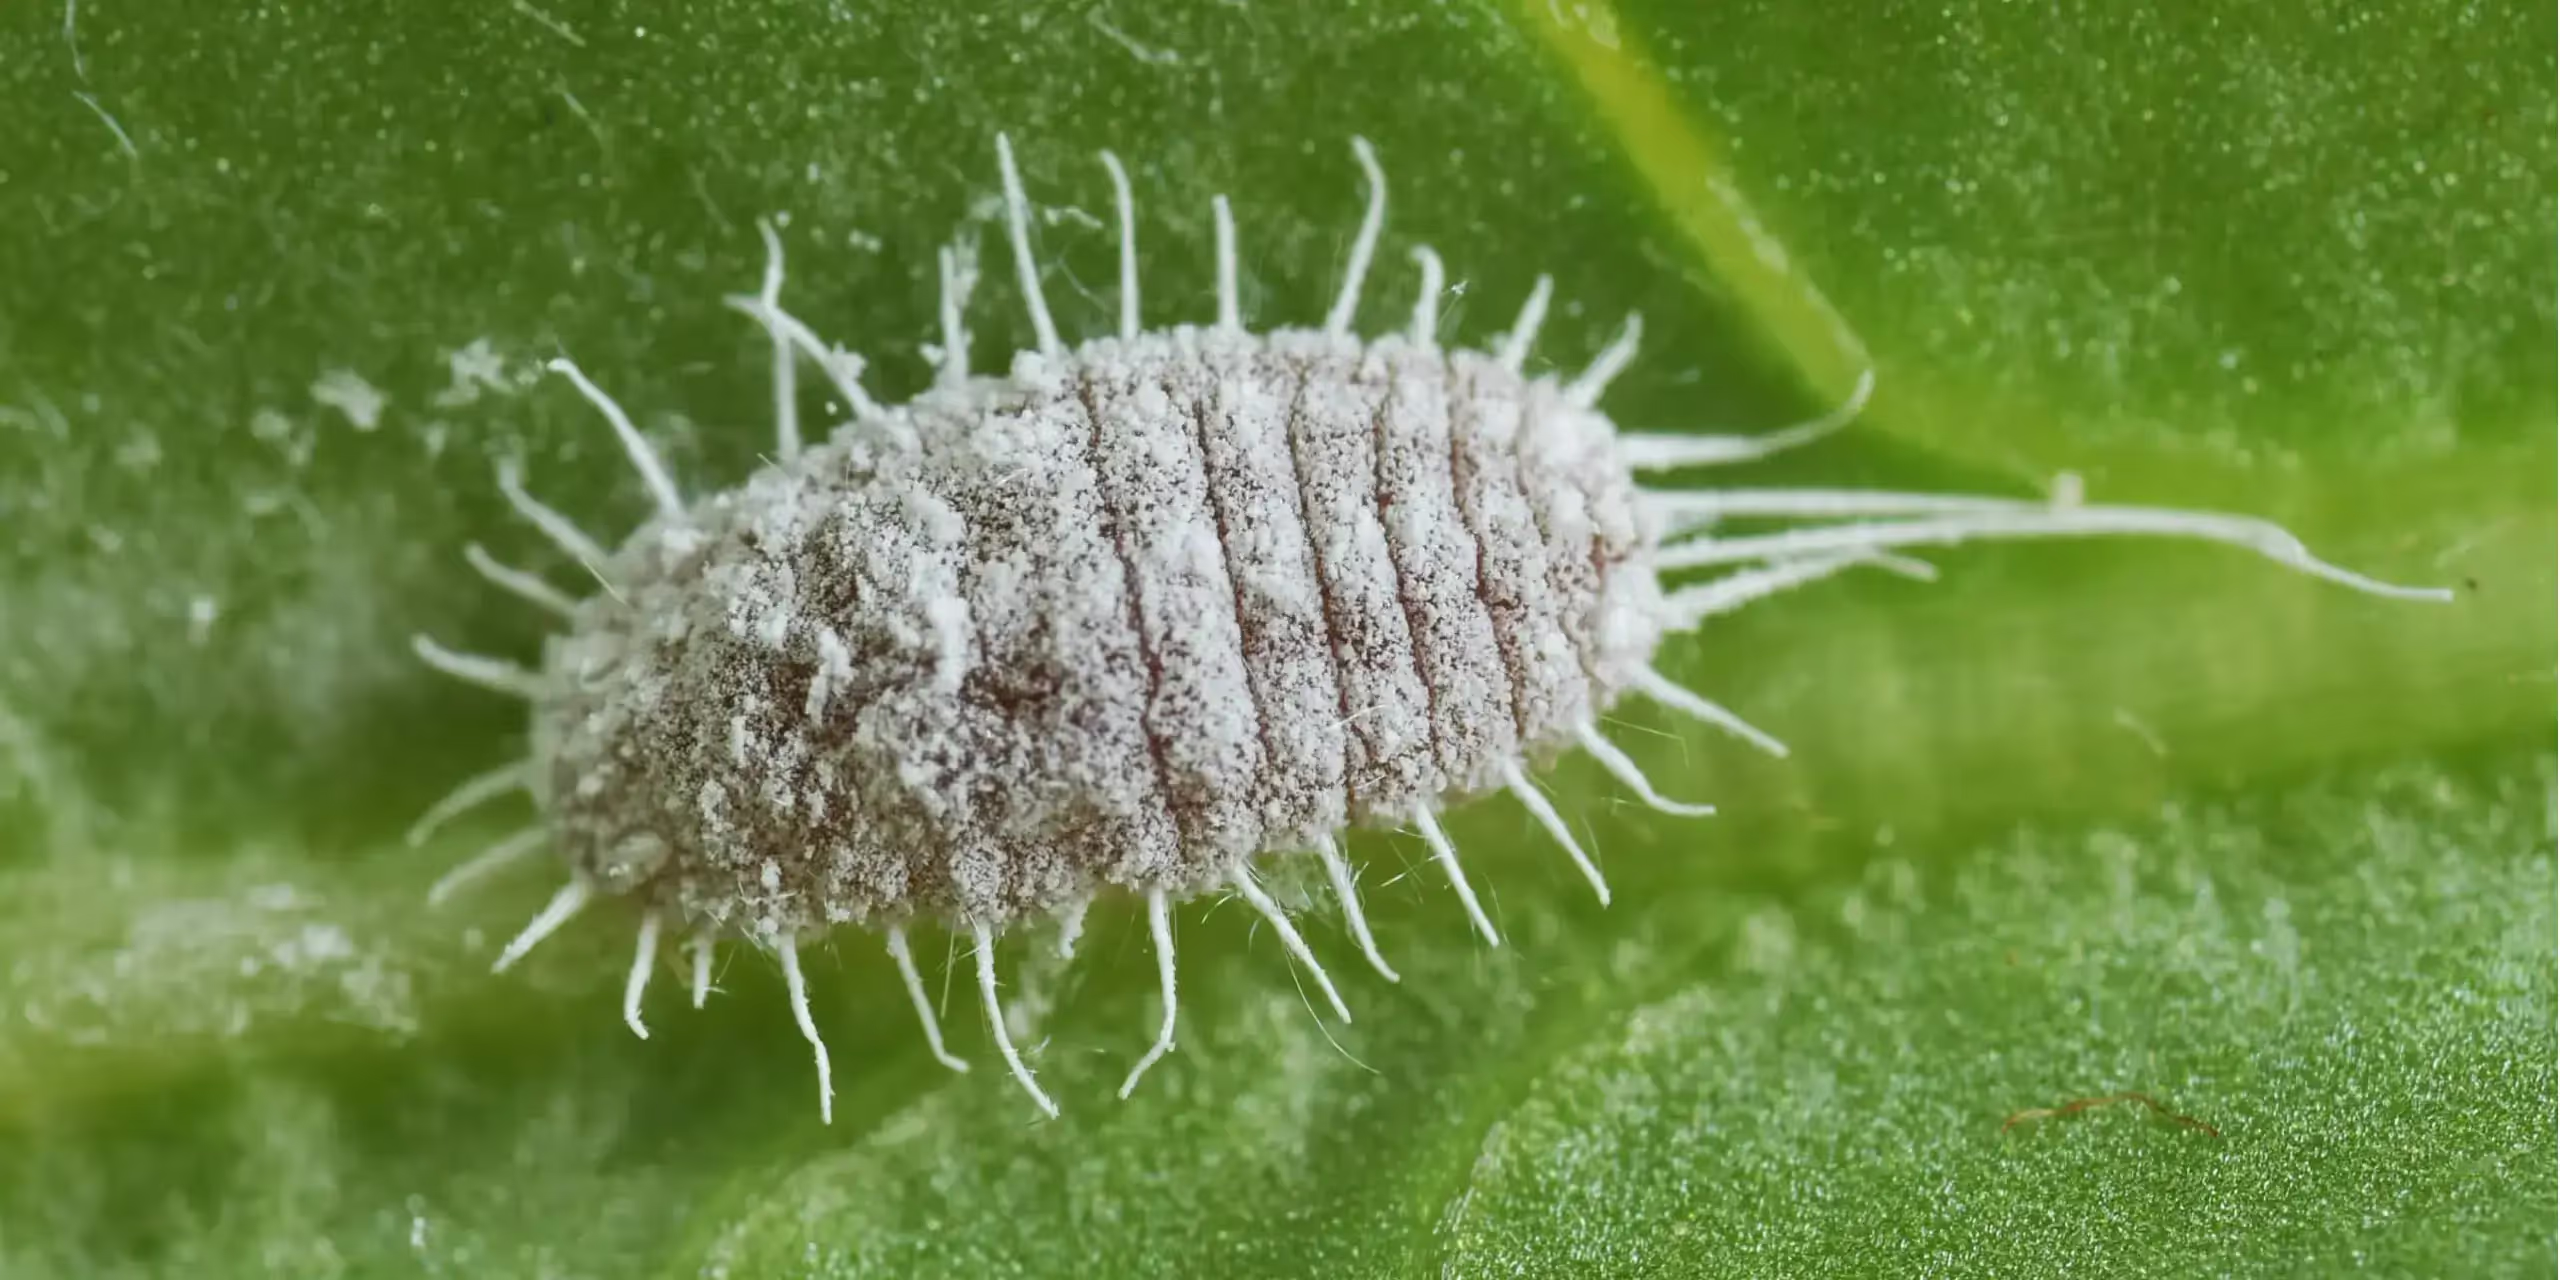
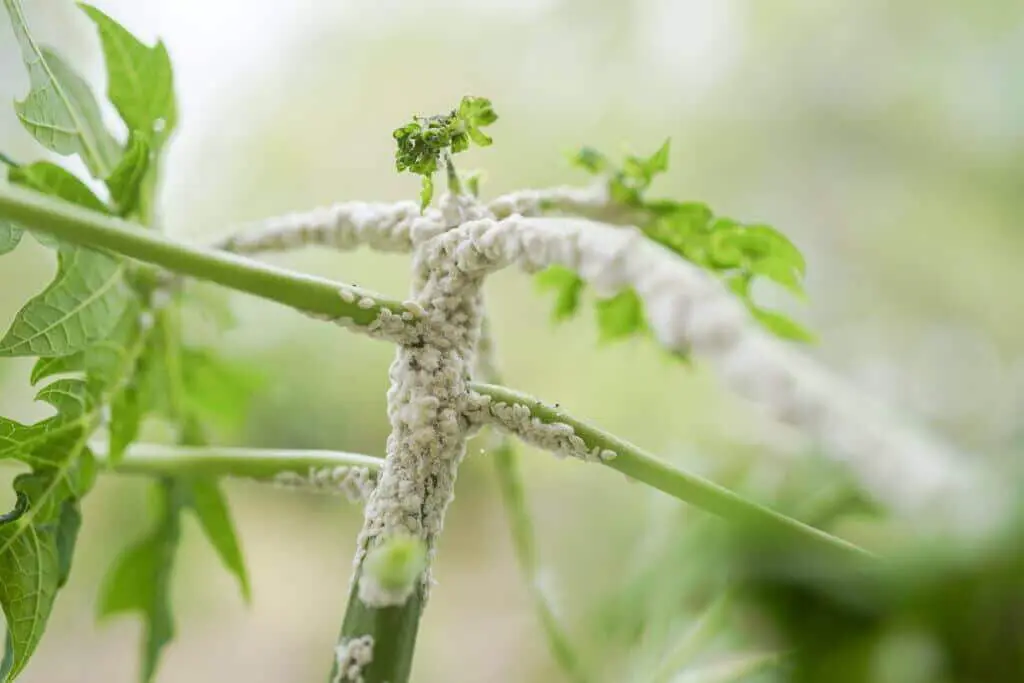
Generally, mealybugs are around 1-4 mm in length. They are soft-bodied insects that form in white fuzzy-looking masses on your plants. In their immature stages, mealybugs can also appear brown or creamy in colour. When in large numbers, their characteristic white cottony appearance can make them look more like fungus or mildew than bugs.
Male mealybugs are the smallest and have wings. It’s unlikely that you would spot the males because they have a short lifespan and they only have one purpose – reproduction! Female mealybugs are larger (visible to the naked eye), wingless and live for longer.
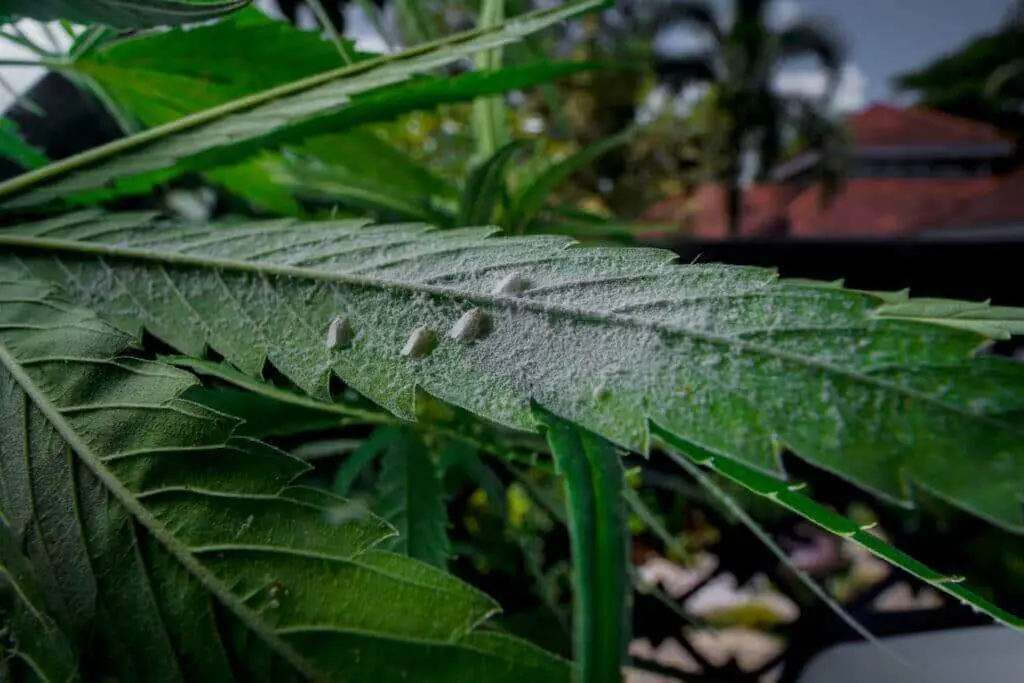
Although mealybugs initially appear as individuals, they slowly migrate to a suitable feeding spot on your plant. Once they arrive in their desired spot, they begin forming white cottony clusters.
The lifecycle of a mealybug
Mealybugs live for around 7 to 10 weeks, and during this time they pass through various life stages.
As previously mentioned female mealy bugs have a longer lifespan than males. However, males pass through five life stages, whilst females pass through four life stages.
Male mealybugs will stop feeding after their first two life stages. The male mealybugs will die as soon as they have finished their sole mission of fertilising the females. Once fertilised female mealybugs start to lay eggs, and they don’t work slowly!
Normally female mealybugs will lay between 300 and 600 eggs in a cotton ball-like case. Mealybugs excrete their egg cases onto your plant’s leaves, often on the undersides of leaves. It’s easy to mistake these egg cases for powdery mildew. Be sure to eliminate this as a possibility, if you spot any white cotton-like masses appearing.
The egg-laying stage lasts for around 2 weeks. Shortly after this, the female mealybugs declare their work is done by dying!
The next stage is hatching which typically happens within 1-3 weeks. Hatchlings are sometimes also referred to as ‘crawlers’ or ‘nymphs’. Small but active yellow nymphs start to travel across your plant. As they travel, they will be on the hunt for the perfect feeding sites to settle on.
Once settled, female nymphs will go through their following three stages of development over the course of about a month. This means that multiple generations of mealybugs can co-exist as long as conditions remain favourable for them.
Where are mealybugs found?
Plants that have naturally high nitrogen levels are most attractive to mealybugs. This is because they contain lots of tasty juices for the mealybugs to feed on. They will also commonly appear on plants that are suffering from over or under-watering.
The most common spots to find mealybugs are on the leaves, stems and crevices of your plants. However, they can also lurk on or under your plant pots. That’s why it’s really important to search and treat the entire growing area that surrounds an affected plant.
How do mealybugs arrive in your grow space?
In short – mealybugs can come from anywhere. But most commonly they will find their way into your grow space in the following ways:
- Transported in on new plant arrivals
- Through contaminated potting soil
- Bought in on plants that have spent the summer outdoors
- Ants can sometimes bring mealybugs to plants so that they can feed on the honeydew produced by the bugs.
Female mealybugs cannot fly and they crawl fairly slowly. So it’s most likely that they will travel into your grow space on an incoming plant. This is why it’s essential to inspect new arrivals. In some cases, it may be best to quarantine new plants before introducing them to your main grow space.
Natural predators struggle to get inside greenhouses and indoor grow rooms because of the physical barriers of these structures. These types of spaces are therefore very susceptible to infestations.
Why am I getting mealy bugs?
It’s worth remembering that mealy bugs are a very common pest. Typically, mealybugs are attracted to plants that have soft growth, and high levels of nitrogen. These are both characteristics of cannabis plants.
The leading cause of a mealy bug infestation is overwatering or over-fertilising your plants. Tackling these issues prevents other common pest infestations or plant diseases.
How to spot mealy bug symptoms?
Mealybugs function by sucking the sap out of the leaves and stems of cannabis plants. This is a similar behaviour to several other pests such as *thrips.*
As they suck the sap out of your plants, they cover themselves in their characteristic white web-like coating. Mealybugs also excrete a sugary liquid known as honeydew. This liquid is particularly attractive to a number of other pests and insects such as ants.
If left untreated, the bite marks left by mealybugs combined with the honeydew makes a perfect breeding ground for fungus. As this fungus begins to cover the plants leaves, the surface area your plants have available for photosynthesis decreases. This will cause your plants to suffer from stunted or deformed growth and yellowing leaves that drop off. So in short- your plants will struggle to survive.
How to prevent mealybugs?
Preventing infestations is always preferable to treating infestations. There are no guaranteed methods to stop mealybugs altogether. However, there are several things you can do to prevent them from entering your grow space or attacking your plants.
Every plant and grow space is unique. We recommend that you try a range of prevention methods to find the ones that are most effective. Here are some prevention methods you could try:
Inspect new plant arrivals
The most common way that mealybugs arrive is by being transported into your grow space on incoming plants. Early mealybug problems are difficult to spot as the bugs are so tiny when first hatched. More established mealybug communities are easier to spot. This is because their characteristic white cotton-like clusters become more visible- look out for these in particular.
This step is especially important if you are purchasing clones, or plants from large growing facilities.
You should also inspect any tools or equipment that come in and out of your growing space. Mealybugs can happily travel on these items.
If you suspect that new plant arrivals are already infested, then keep reading to learn about treatment methods.
Keep your plants healthy and strong
Plants that are weak or stressed are more likely to fall victim to an infestation. Keeping your plants strong and healthy is the aim of the game regardless. But it’s also a key way to prevent pest problems.
Monitor your grow space
Mealybugs favour tropical conditions and are highly reproductive if the conditions suit them. With that in mind, keep a really close eye on the temperature and humidity levels of your growing space.
It may also be beneficial to try dropping the nighttime temperature of your grow set-up. This will further prevent the warm and moist conditions that mealybugs thrive in.
An accurate way to do this is by using a smart agri-sensor such as a Grow Sensor. This bit of kit will take the headache out of environmental monitoring for you.
The sensor will provide you with live, detailed and accurate data. This data will inform you of the temperature and humidity of your grow space, along with many other variables.
Monitor your feeding and watering levels
Overfeeding and overwatering your plants has several negative impacts. One of these impacts is that it increases the nitrogen levels in your plants. And, remember, mealybugs are attracted to the juicy sap that is created by nitrogen-heavy plants.
Promote beneficial insects
A growing environment that is attractive to beneficial bugs is a great way to keep mealybugs, and other unwanted critters away. Some of the most recommended beneficial bugs are ladybirds, lacewing and predatory mites.
Keep your plants clean
As well as keeping plants healthy, keeping your plants clean is another way to easily spot mealybugs. Clean plants naturally limit the likelihood of mealybugs occupying them. However, keeping plants clean can be easier said than done when it comes to cultivating cannabis plants.
In the vegetative stage, regularly wiping the leaves and stems of your plants is recommended. Once you reach the flowering stage this is much harder to do without causing damage to your plants.
Vigorously spraying your plants with water regularly can prevent mealybugs from settling on your plants. Just make sure your plants are strong enough to withstand the blast of water!
Diatomaceous earth
Diatomaceous earth is a specially designed powder that is made from fossilised shells.
When mealybugs come into contact with diatomaceous earth they will end up with lots of tiny cuts all over their bodies. This body damage will result in death by dehydration.
Using this powder can be both a preventative measure and a treatment method.
Diatomaceous earth is most beneficial when used in the potting stage. Simply sprinkle it around the base of your plant and the rest is taken care of for you.
The shell composition of this soil means that it is sharp at a microscopic level. This means that it’s completely safe for handling by humans, but for the mealybugs it spells disaster.
Master your gardening – sign up for the Grow The Best newsletter!
How to get rid of mealybugs – fast!
If you are reading this because the mealybugs have already made a home on your plants, then fear not! We have some tips on mealybug removal and how to stop them from coming back!
Just like the prevention methods, it’s recommended to try more than one, or a combination of mealybugs treatment methods. This will ensure that you find the one that is most effective for you. By trying one method at a time, you can monitor the success of each method before moving on to the next.
The first thing to do if you discover mealybugs is to isolate the affected plant/s. This is the best way to prevent the infestation from spreading to your other plants. Mealybugs can live on plant pots and surrounding surfaces. This means that it is important to thoroughly clean the area where the infested plant was too.
Once you have isolated any affected plants, here are some of the best mealybug treatment methods you can try:
Manual removal
Unlike some pests, mealybugs don’t bite or carry diseases. So it is perfectly safe to try to remove them from your plants manually. However, depending on the size of the infestation and the growth stage of your plants, manual removal can be tricky.
For example, mealybug removal is more achievable during the vegetative stage than the flowering stage. It’s easy to cause irreversible damage to your plants once they are flowering.
If you don’t fancy picking the bugs off, you can try to blast them off with water. The easiest way to do this is by using a simple spray bottle. You can buy these from most garden centres or DIY shops. You will need to repeat this action regularly to ensure that all the bugs have been dislodged.
Another way to achieve mealybug removal, especially more established infestations, is to prune out the affected areas. Just so long as you don’t have to prune away the entire plant!
Remember that if you do manually remove any mealybugs, be sure to dispose of them properly. This prevents simply moving the problem elsewhere.
Insecticidal soap
Insecticidal soaps are a natural pesticide designed to weaken mealybugs. They work by covering them in a solution that breaks down their protective white cotton-like coat. This causes the mealybugs to become dehydrated, and eventually, that will kill mealybugs.
Insecticidal soaps can be harmful to humans and animals in strong concentrations. It is essential that you dilute them before use. You can use an insecticidal soap purchased off the shelf in a garden centre. Alternatively, you can make your own at home.
To try a homemade insecticidal soap, you simply need washing-up liquid and water. Make sure you use a washing-up liquid that is fragrance-free. It’s also important to check that the washing-up liquid doesn’t contain any additives that might be harmful to your plants.
It’s best to start with a weak solution and then strengthen it if needed. You can start by mixing one teaspoon of washing-up liquid per 4l of water. This solution can be applied using a spray bottle. Apply it just as you would if you were attempting to wash the bugs off your plants.
This method will need to be repeated regularly, perhaps weekly until the infestation has completely gone.
Beneficial insects
As mentioned in the prevention methods, using beneficial insects is a great way to prevent pests from reaching your plants. But, insects can also be used to treat infestations. However, this method rarely works on its own. It is recommended to use another method in conjunction to have the best chance of actually getting rid of an infestation.
Insects such as ladybirds, lacewings, predatory mites and thrips are the best options to choose from. There are also some spider species which can be tried. But best of all is the black ladybird which is also known as the ‘Mealybug destroyer’!
All these beneficial insects are readily available from garden centres or commercial online retailers. Beneficial insects can also be used to treat other pests such as white aphids. They are best suited for use in indoor growing environments and greenhouses because you want to keep the insects contained. Escapees are no use to you!
Patience and dedication
This isn’t a treatment method in itself, but more a philosophy to keep in mind. As with many pest problems, there are no easy fixes or overnight solutions even with light infestations.
Whichever mealybug treatment method you decide on, you will need to repeat it regularly to be effective. This is especially the case with heavily-infested plants.
So it’s essential to remain patient and dedicated. Maintain a sustained attack on the mealybugs, or any other pest for that matter. Don’t let them win!
Takeaways
-
Mealybugs are a very common pest. They are tricky to spot so it’s likely that you will encounter them at some stage in your growing journey.
-
You want to focus on prevention rather than treatment wherever possible. By employing prevention methods, you will hopefully keep mealybugs, plus many other pests away from your precious plants.
-
Be really strict on what comes in and out of your grow space. This will limit the opportunities for mealybugs or other pests to find your plants.
-
Your chosen treatment methods need to be applied regularly and repeatedly to be effective
-
It’s a good idea to try several prevention and treatment methods to find the one most suited to you. However, be careful not to try too many things at once. It’s much easier to monitor the success of a method when you trial them one by one.
Get the latest grow tips – subscribe to the Grow The Best newsletter now!