Get your free CO2 calculator
Grow the best plants with your FREE CO2 calculator.


Spider mites on plants is something that every grower will come up against sooner or later.
They affect plants grown outside, house plants and plants grown indoors in grow rooms and in grow tents too.
Spider mites are a pest that can have a serious detrimental effect on your plants, reducing vigour, yields, quality or even killing your plants!
In this post I’m going to cover:
Disclaimer: Any information given on this site is for educational purposes only. Please ensure if you’re growing cannabis you’re doing so in accordance with the law and subject to appropriate permissions and licenses of the applicable country.
Let’s get to it! 👉

Spider mites are tiny pests, no bigger than this full stop —> . They’re almost impossible to spot unless you have a magnifying glass. 🧐 Sounds harmless enough right?
They belong to the mite family Tetranychidae and aren’t actually insects. They’re arachnids with eight legs and are more closely related to ticks, scorpions and spiders.
Mites usually live on the underside of the leaves of your plants and they spin a web of silky fibres for protection (hence the name SPIDER mites.)
They live in colonies and get their nourishment from piercing your plant’s leaf tissue and feeding by sucking on your plants fluids.
When spider mite colonies on your plants become large or established enough they are incredibly destructive.
There are approximately 1,200 different species of spider mites. 😲 That’s a lot too many to list here!!
Some species eat only a few types of plants, whereas others feast on a wide variety of plant types.
Certain spider mites do well in cold weather, but the majority prefer to feed and reproduce in warmer drier weather.
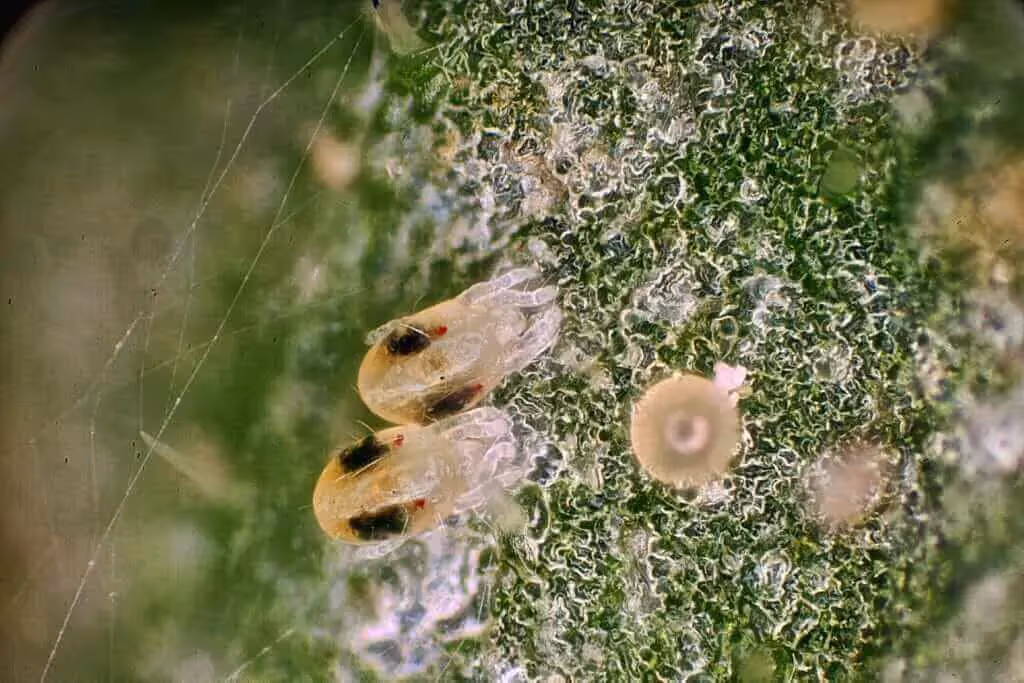
Spider mites come in a variety of colours including browns, yellows, reds and greens. The most common type of spider mite is the two spotted spider mite or red spider mite.
These mites are commonly found in orchards, gardens, fields, greenhouses and indoor growing environments. And this is the type of mite that I’ll focus on for the rest of this post.

Illustration by D. Kidd.
Red spider mites can procreate to form between 6 and 10 further generations of spider mites each year. 😱
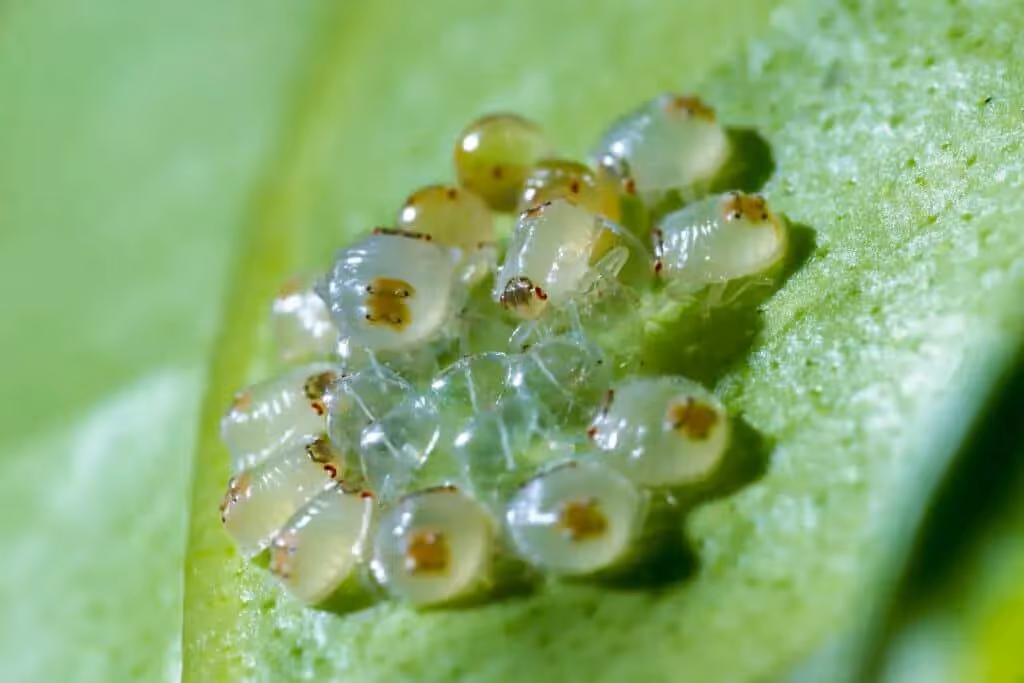
When female mites come out of hibernation in the spring, they lay their eggs in communal silky spider-like webs which are affixed to the underside of a plant’s leaves and often along the leaf’s veins.
These fine silk webs can be very hard to see with the naked eye.
The gender of spider mite offspring is determined by fertilisation. Fertilised mite eggs result in female offspring. Unfertilised eggs result in male mites only.
Spider mite eggs are semi transparent and are TINY! You’ll need a magnifying glass to see them. As the eggs mature, they become more of a creamy colour before they hatch.
The length of time that it takes a spider mite to go from an egg to a fully formed adult varies a lot depending on the environmental conditions.
Under ideal conditions around 27°C (80ºF) and 20% relative humidity, spider mites can develop completely in as little as three days.
In temperatures of 10°C (50ºF) and 20% relative humidity that development process can take up to nineteen days. If conditions are really suboptimal, it could take up to 30 days.
An adult female spider mite’s lifespan is two to four weeks. During that time she will continue to lay more than a hundred tiny white eggs that will result in overlapping generations of offspring.
Spider mites are able to reproduce at a frightening rate. 10 mites in May could result in 1,000 mites by June time, and then 100,000 by July. 😲
When enough time has passed since the egg was laid (depending on the environmental conditions) the egg will hatch and a larva will emerge.
Spider mite larvae have six legs and are colourless. They only grow to be slightly larger than the egg that came out of.
The larval stage is when the mites start to feed on your plants cells. Spider mites use their mouth to pierce a hole into a leaf and it’s cells before sucking out it’s contents.
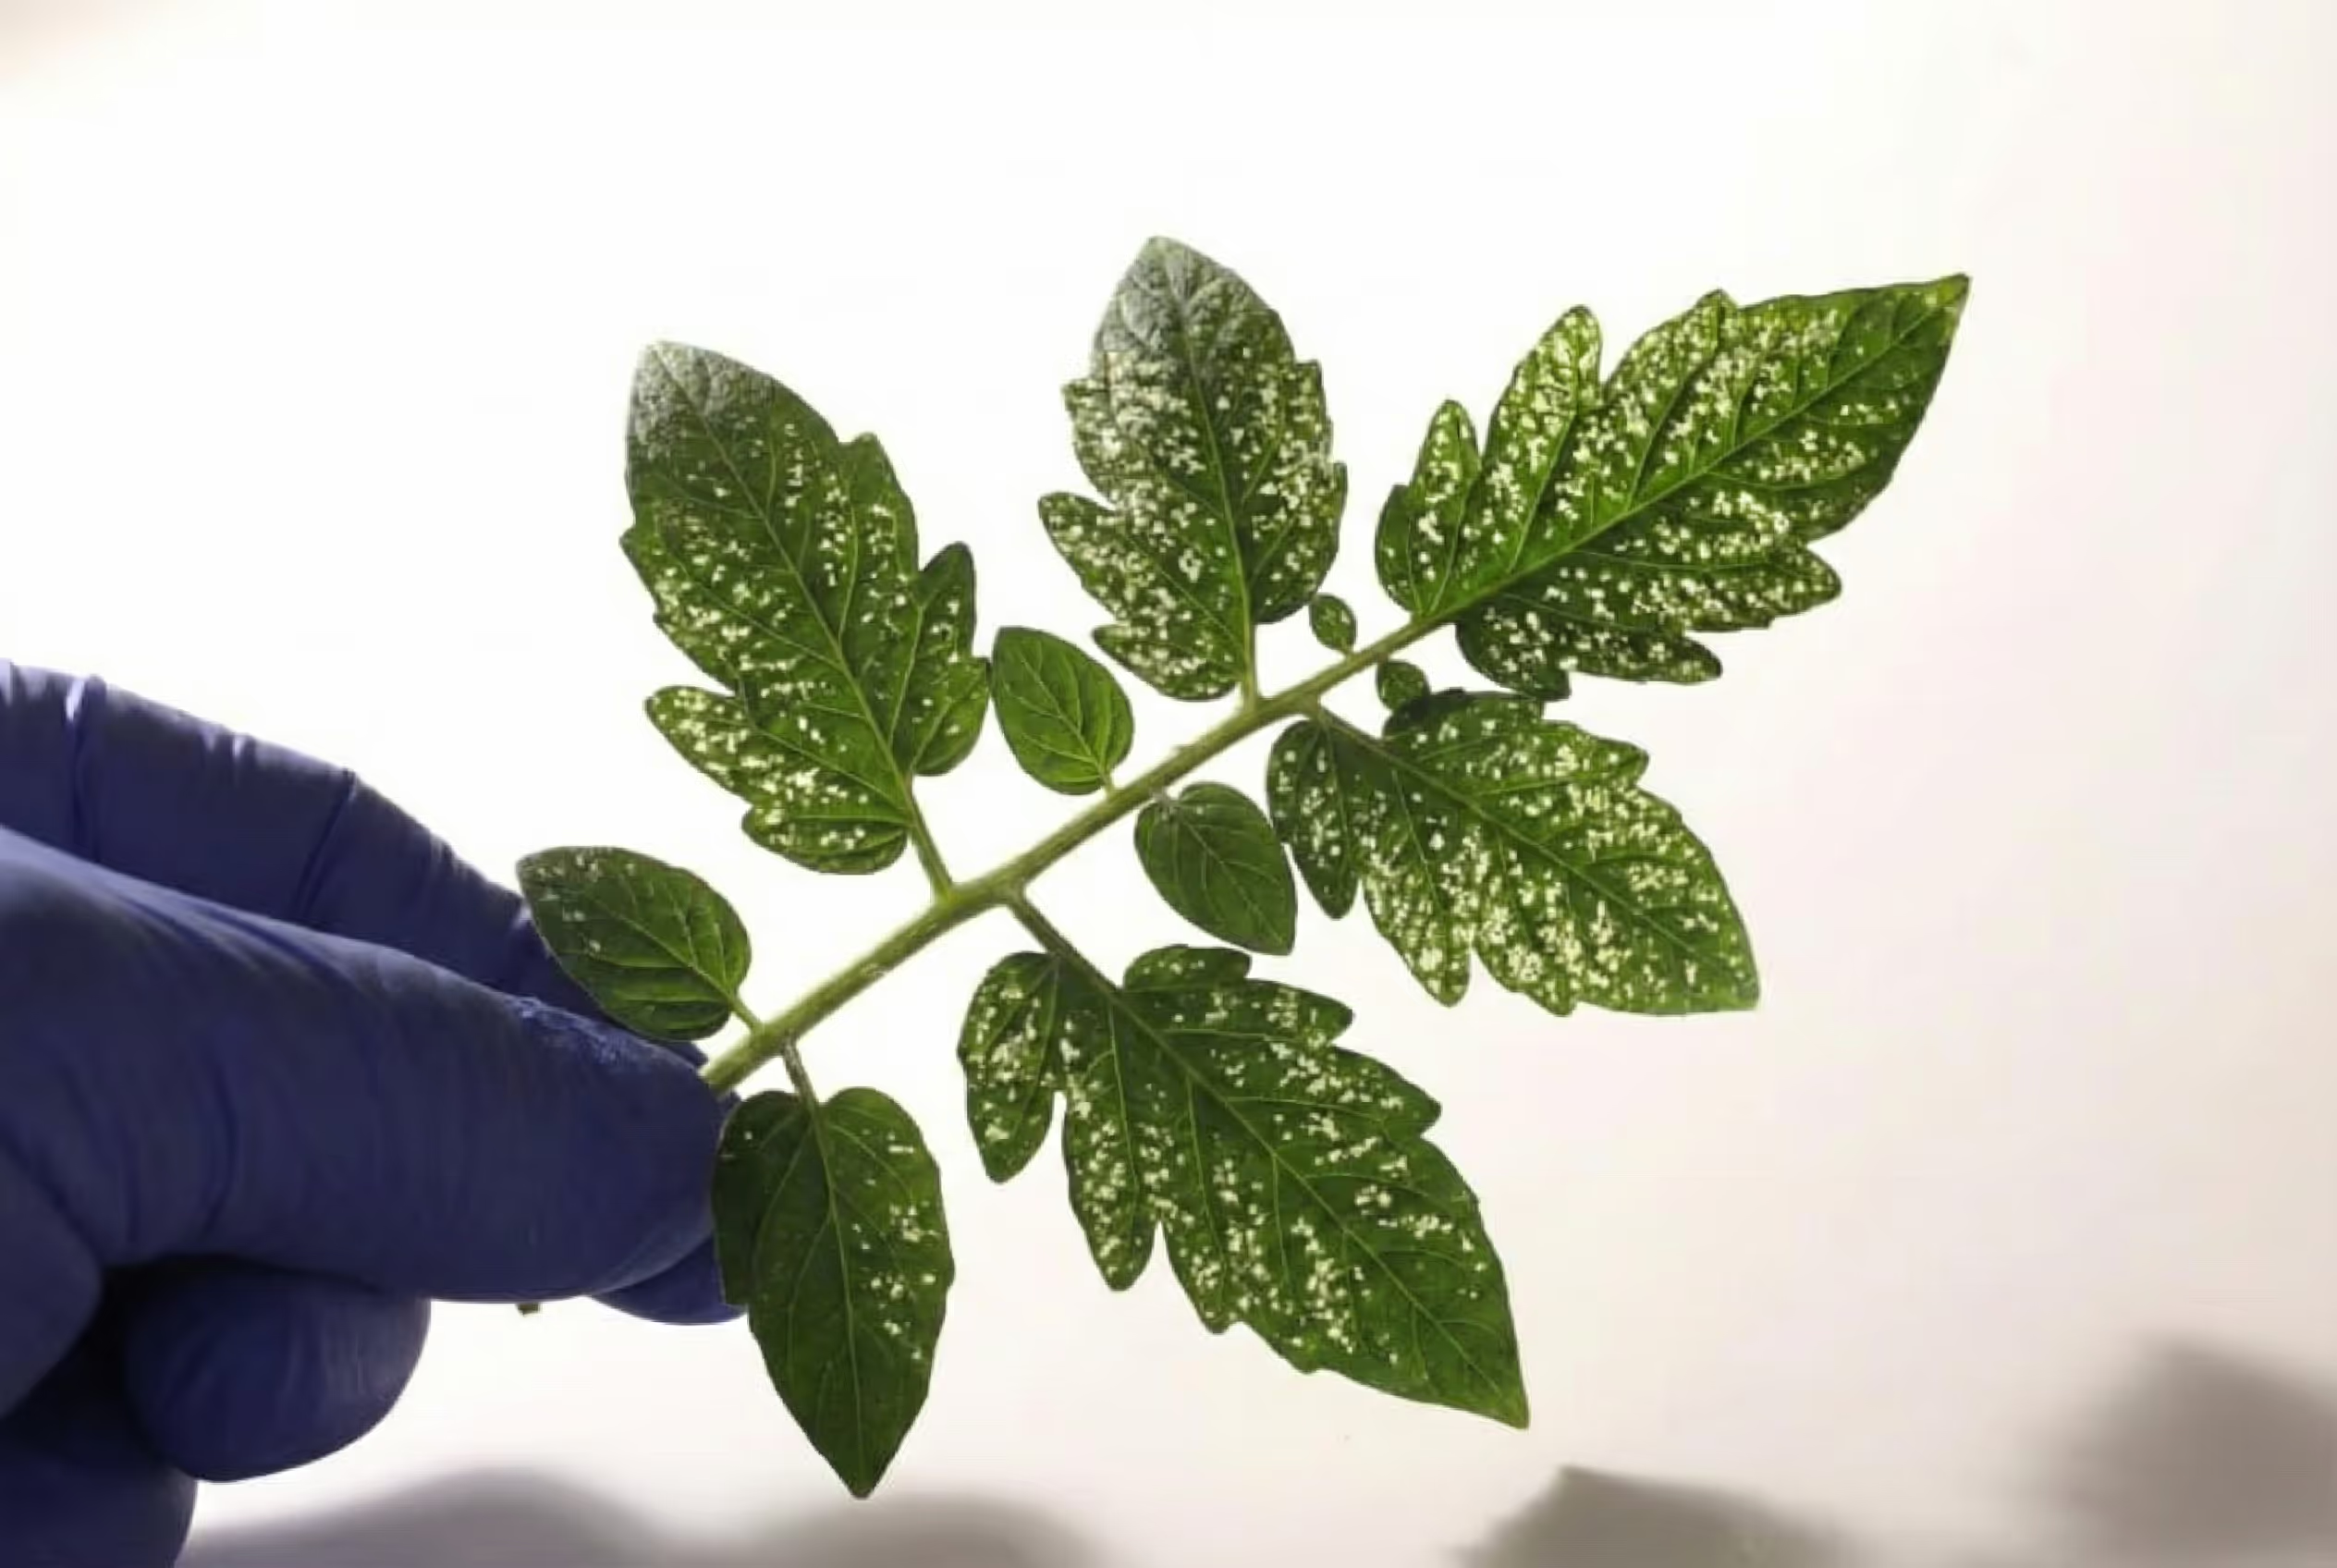
When mites feed, they damage plant cells which starts to cause the characteristic “leaf stippling” or dots on the leaf.
The dead or dying plant cells turn yellow brown and are often visible on the upper surface of the leaf.
Larval spider mites don’t feed for long before they take a rest and then moult into their nymph stage.
It’s between the larva and nymph stage that spider mites grow their additional 2 legs.
Once they become nymphs they can produce webs, but they are unable to reproduce until adulthood.
During the nymph stage, mites look like adults but smaller. They are white with green spots.
The nymph stage is made up of a further two phases (protonymph & deutonymph.)
After feeding, spider mite protonymphs go to the underside of the leaf to moult and emerge as deutonymphs.
Mites then start the process of feeding again until ready to change into adult mites.
Spider mites can pass through both nymphal stages in as little as 5 days.
Deutonymphs moult to become adult spider mites.
In indoor conditions, adult spider mites can be semi transparent, white or cream. When outdoors or if manipulating daylight hours whilst growing indoors, orange, red or brown colouration can be seen.
Full grown female spider mites are more round bodied and the males are a little smaller and more oval shaped.
The moment that an adult spider mite emerges, they are sexually mature and able to lay eggs within days. Every female spider mite can lay up to 20 eggs per day.
As spider mites colonise a plant, they produce a lot of webbing and also search for other plant hosts.
In autumn time, mites strive to find a place to hibernate. The adult mites can overwinter without needing to feed. Usually they overwinter in leaf litter, plant material that’s died back, under tree bark or in soil.
They then re-emerge in spring ready to start the whole process all over again!

Because spider mites are so tiny and light, they can be transported (aided by their webbing) on the slightest breeze.
They also easily attach to and travel on clothes, shoes, pets etc and given how prolific they are in the first place, it’s no wonder they get everywhere!
So some types of spider mite may be happy only eating a few different plants…
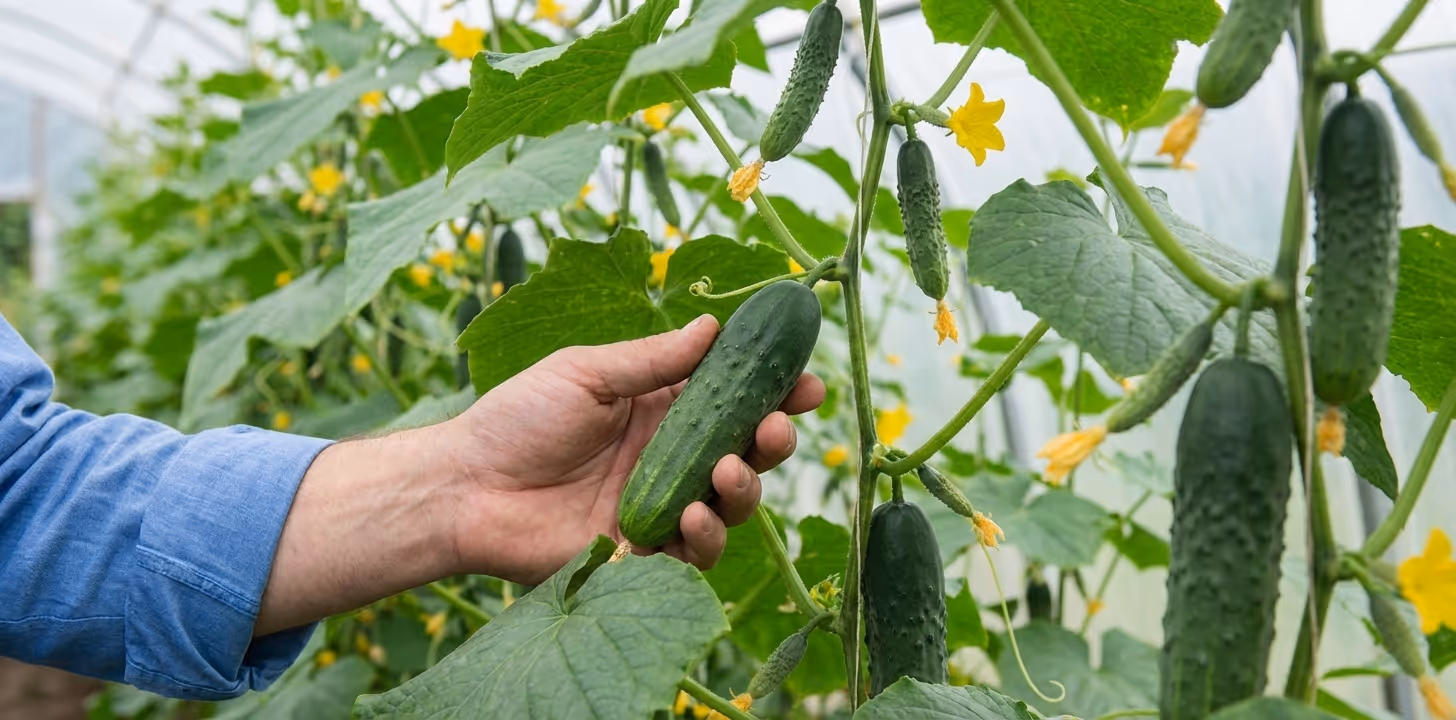
But the red spider mite is a greedy *&%$@&* and happily munches on more than 200 different types of plants, including most vegetable and food crops, trees and garden plants!
Tomatoes, peppers, strawberries, maize, beans, ornamental plants and your prized cannabis plants are all on the menu! 😩
It’s not so much that cannabis is inherently more vulnerable than any other plant…
It’s more that spider mites are just particularly problematic when growing cannabis indoors for a number of reasons.
Just a few can become a full blown infestation incredibly quickly – before you’ve noticed one single mite!
There are other factors in addition to rapid reproduction that make spider mites the most feared pest among cannabis cultivators.
To support speedy development, spider mites need to eat. A LOT.
Mites can do a debilitating amount of damage to your plants in a very short time. A serious infestation gone untreated could finish off a plant overnight.

Spider mites happily munch away on the chlorophyll within cannabis (or any other type of plant’s) leaves.
Chlorophyll is essential for photosynthesis so plants can create their own food.
If mites deplete chlorophyll, they effectively starve the plant and limit its ability to heal and repair by disrupting photosynthesis.
The silky webbing that spider mites create also renders your crop ready for the bin.
Even if you do manage to get an infestation under control. It’s not recommended to consume cannabis covered in webbing.
Probably the worst trait of the spider mite is their incredible resistance.
Different treatments are required depending on what stage of life the mites are in. And during certain life cycle stages, spider mites are immune to many treatment methods.
Mites are also known to become insecticide resistant making them seem pretty much impossible to eradicate if you don’t completely wipe out the infestation the first time around.
It’s easy to see why spider mites have earned the nickname ‘the Borg’ within the cannabis cultivation community! (‘Resistance is futile’ … eeek!)
That’s not to say that other crops aren’t valuable, but losing even a few prize cannabis plants to spider mites can be a catastrophe to hobby growers and larger growing operations alike.
Improve your harvest – join the Grow The Best newsletter today!

Most types of spider mites prefer hot, dry, drought like conditions. When it comes to growing indoors, they are more likely to be problematic on under-watered plants.
But spider mites really like indoor cannabis growing conditions – both hydroponic and setups that use soil too.
Although the conditions can be a bit more humid than they’d prefer, the temperatures are spot on for encouraging mite population multiplication!
Overfeeding can also put your plants more at risk of spider mites as it makes the sap within your plants taste sweeter.
Spider mites have a preference for plants with more nitrogen, phosphorus and carbohydrates present in their leaves so your rigorous feeding schedule may well be working against you!
Often indoor growers are keen to get the most from their grow room and so squeeze in as many plants as possible.
But mites become even more difficult to prevent and control in crowded conditions because they’re harder to spot, they’ve got more food sources and there are more places to hide.
A lot of growers experience and suffer from spider mite infestation and damage in the latter part of their grows.
This is because often, flowering guides tell you to reduce humidities substantially when it’s time to flower and spider mites prefer a low humidity, warm and still environment.
The thing is, you don’t even need to reduce humidities drastically as soon as you hit flowering! I’m going to come back to that point later.
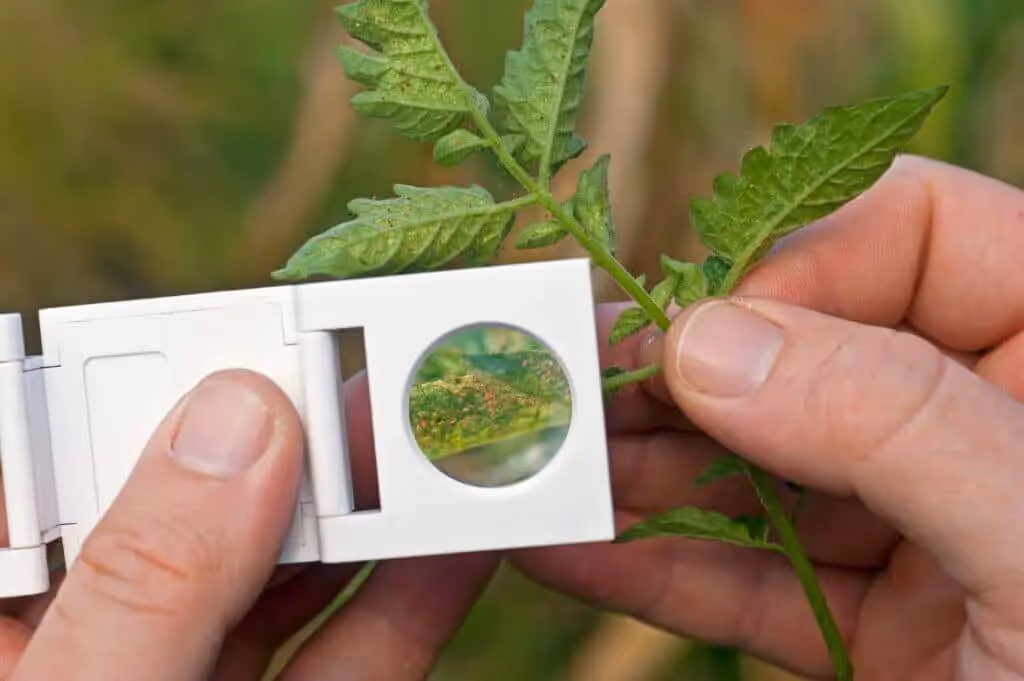
Due to the size of spider mites, it’s pretty hard to detect them on your plants with the naked eye alone.
Before webs start to show, all you might see is that the underside of plants leaves looks a little dusty.
To identify spider mites accurately, you need to have a 10x hand lens. Take your lens and get a really good, close look at the underside of the leaves and around leaf joints of your plant.
If you’ve got spider mites in residence, you’ll see dots moving around, which on closer inspection will look like oval bodies with eight legs. Eggs look like tiny round transparent globes.
If you’ve not got a lens, but you have got reason to think you might have spider mites living on your plants, you can hold a piece of white paper underneath the leaves and gently shake them.
If little specks fall onto the paper that look almost like ground pepper, there’s a good chance that you’ve got mites.
Once you’ve got visible webbing, identification of spider mites is easier… but addressing the problem just got more difficult!
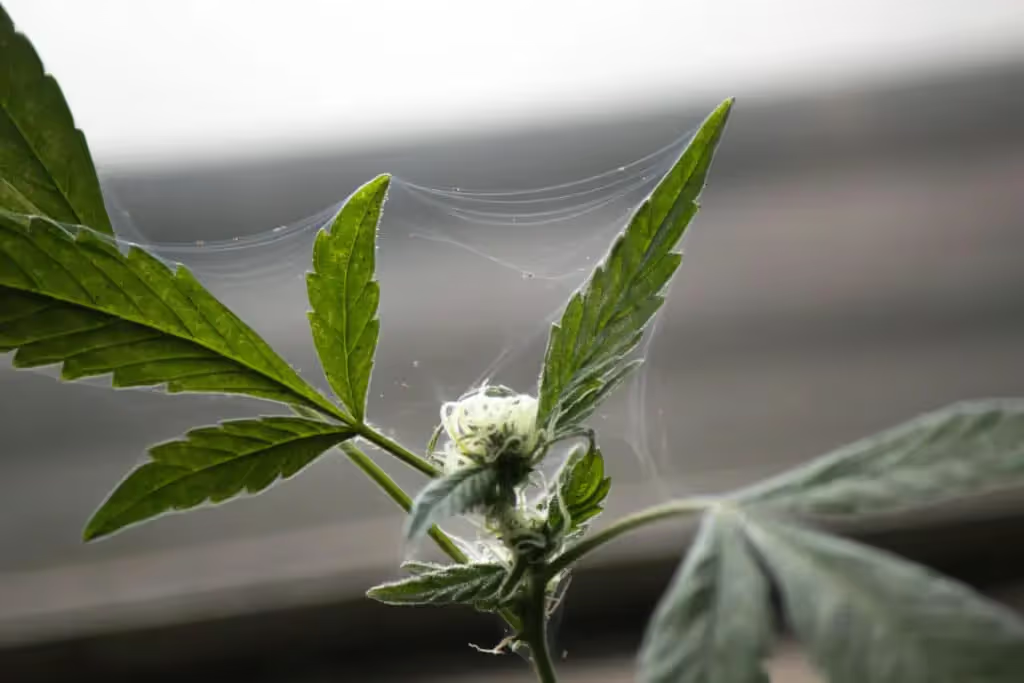
The webs spider mites create are silk like and delicate. Early on in an infestation, you might only see a few strands of web hanging from a leaf or leaves.
This quickly progresses to more pronounced webbing on the underside of leaves, around leaf joints or covering flowers.
With established infestations you may be able to see dusty or sandy dots moving around within the webs.
Another possible way to identify spider mites, is by the damage they inflict on your plants and the resulting symptoms your plants exhibit.
We know spider mites pierce your plants tissue, suck out the liquid inside and feed on chlorophyll which in turn disrupts the process of photosynthesis.
This leaves physical evidence of spotting or stippling on leaves.
The problem is that this can be confused as a potential nutrient deficiency and treated as such.
This results in the infestation being overlooked whilst it’s still small and most easily treatable.
The initial damage to be on the lookout for is small bleached looking or yellowish spots on the underside of your plants leaves. Over time these spots can turn red / brown.
Often this type of damage starts at the base of the leaf and continues alongside the main veins.
If your leaf’s surfaces are displaying yellowish or semi-transparent patches, this is the visible trail of destruction from mites sucking out sap and chlorophyll.
This is a clear indication that you’ve got an infestation that’s taking hold!
If left untreated, this discolouration can eventually cover the whole of the leaf’s surface. Resulting in the affected leaves withering away and falling from the plant.
This defoliation and remaining sickly leaves can have a significant detrimental effect on your cannabis plants.
This in turn will affect your yield and that yield’s quality.
In serious infestations, 80% – 100% of the leaves may be affected and the plant will eventually stop growing, and if treatment is neglected, die.
If spider mites take hold later in the grow cycle during flower, their webbing will cover and affect the buds which will hinder their ability to mature and develop properly.
And as mentioned earlier, buds covered in spider mite webbing are not fit for consumption.

Oh how I wish I could tell you there was a magic quick fix to get rid of spider mites!
Eradicating an infestation is no small task, you need to be methodical and it takes pragmatism, and persistence… And you need to act fast!
There are a number of different ways that you can treat spider mites:
And often you’ll need to use many several (or many!) different methods in a multi pronged attack.
So let’s get to it and take a look at each of those in turn, starting with physical methods of dealing with spider mites, as that’s often the best place to start.
It’s really important to clean up and then aim to maintain super high levels of cleanliness, so here are some things that you should consider doing immediately.
You need to take measures to try and stop spider mites from getting a better hold than they already have.
The action you need to take will depend on your setup – how many plants you’re growing vs how many are affected and how bad the infestation is etc.
If you’ve got enough plants to sacrifice a few – remove obviously infected plants & safely dispose of them. Then carefully inspect all of your other plants for signs of infestation.
If you’ve not got enough plants to be able to dispose of any, arm yourself with a magnifying lens and carefully inspect your plants – all over!
Remove leaves that look to be 50% or more affected & carefully place them inside a sealable plastic bin bag or similar.
Don’t let the infested leaves come into contact with any other parts of the plant, or any other plants – treat spider mites like a biohazard and engage containment protocols!
If you have a handheld vacuum to hand, using this could help you to capture and remove a large number of adult mites, nymphs, larvae and eggs present.
This technique has the advantage of effectively treating all life stages of the spider mite.
This must obviously be done gently. Depending on the size and robustness of your plants – maybe very, very gently!
Move the vacuum over the bottoms and tops of the leaves and leaf joints of all of your plants.
Ensure that you dispose of the contents of the vacuum safely when you’re done.

Physically removing mites from your plants by spraying the leaves with cold water from a hose or spray bottle or by using a wet sponge can be a good way to quickly cut down on numbers of spider mites.
It can be a good idea to employ this technique before you move onto using additional treatments.
Spider mites love hot, dry, still environments so create an environment that is the opposite of that…
At least until you’ve got an infestation under control and to make it more difficult for them to reproduce whilst you employ other tactics.
Lower temperatures and increase humidity in your grow space, and use fans to ensure you’ve got a lot of strong air flow over both your plants and growing medium.
Biological pest control is the introduction of an organism or beneficial insects into a grow space that will attack or eat the pest species.
Releasing a natural spider mite predator into your grow area will hopefully result in a reduction in numbers to a manageable level.
Fortunately, there are many insects and also other mites that prey on spider mites.
Spider mites’ natural predators include thrips, lacewings and ladybirds, but most professional growers employ the use of predatory mites because most can reproduce even faster than spider mites!
When using predatory mites, you want to choose a species that’s most suited to the environmental conditions that you’re cultivating.
Introduce the predator mites as soon as you possibly can because chances are the spider mites have a hefty head start.
If you’re going down the predatory mite route, there’s a couple of things to consider….
You can buy predatory mites from many outlets specialising in biological control online but availability can depend on the time of year.
Bear in mind that these are living creatures and as such can be detrimentally affected by extremes of heat or cold etc.
It’s advisable to opt for the speediest shipping method available to try and ensure as much as possible that the organisms reach you in good shape.
You’re going to want these guys to stick around, so you’ll need to avoid using any pesticides – this is important so factor it into your multi pronged attack plan!
Predatory mites come in bottles with vermiculite or sawdust. You can buy bottles containing 500 right up to thousands of mites.
When it comes to application, it’s usually a case of shaking the bottle before emptying the contents onto your plants, paying special attention to the areas where spider mites have taken hold.
One of the main benefits to using predatory mites is that they can eat hundreds of spider mites per day and pose no risk to your plants, people or pets.
Here are a couple of the most widely used and recommended predatory mites…
This mite is from the same family as the spider mites and is similarly voracious! It’s appropriate for use when your plants are in veg and flowering.
Each adult predator mite can eat between 5 and 7 adult spider mites or up to 20 eggs per day. (They also eat larvae and nymphs,)
Phytoseiulus Persimilis needs high humidities to grow (min 70%) and temperatures from 20ºC to 30ºC. Time from egg to adult is one week.
Females can lay 50+ eggs during their lifetime (4 female offspring : 1 male offspring) meaning that the population can grow 44 times per generation.
If the spider mite population becomes exhausted, Phytoseiulus Persimilis feed on themselves until they die out naturally.
This predatory mite goes through a similar lifecycle to spider mites (egg, larva, protonymph, deutonymph, adult) within 4 days at temperatures of 29ºC.
They are effective within a broad temperature range (8-35ºC) but it’s worth noting that rate of growth and reproduction is significantly reduced when temperatures dip beneath 10ºC or when humidity levels raise above 60%
Adult Amblyseius Californicus’ lives for 20 days. During that time, it lays 3 eggs per day. They eat up to 5 adult spider mites per day in addition to larvae and eggs.
These predatory mites can long outlive spider mites without any source of food, so some growers use these as a preventative measure. They are also pretty resistant to pesticides.
Other effective predatory mites include:
Even if you’re able to balance ideal growing conditions for your plant, with ideal conditions to support your army of predatory mites, controlling a spider mite infestation with biological measures alone is hard.
So let’s take a look at biopesticides and miticides and how they can help.
Pyrethrins are substances considered miticides derived from chrysanthemum flowers.
They’re something often found in bug sprays, anti mosquito, and anti fly preparations for people and pets.
Pyrethrins work by attacking the neurones of insects. They can come in a variety of preparations.
It’s recommended to apply pyrethrins 2 or 3 times, leaving a gap of up to 5 days in between.
Warning: Spider mites are pretty resilient and it has been noted that some red spider mites can build a resistance to pyrethrins so always keep a close eye on any infestation that you’re treating to monitor your treatments’ effectiveness.
Extract of cinnamon is also used in a number of biopesticides due to it’s acaricidal properties.
It doesn’t affect mite eggs but is effective against adult mites. This means that you’ll need to apply every 3 days over a number of weeks to ensure you take care of the eggs that will continue to hatch.

Neem oil is pressed from the nuts of the neem evergreen tree and is used to treat all manner of garden pests.
It is effective at killing spider mite eggs and larvae as well as adult mites. It also provides a repellent to prevent reinfestation.
Neem oil mixed with water can be wiped or sprayed onto your plants surfaces – make sure you apply evenly all over the underside and top of your plants leaves.
When spider mites are exposed to neem oil, it affects their digestive and more importantly reproductive system to interrupt the reproductive cycle.
Neem oil needs to be reapplied every 7 days. You can stop reapplication when you can no longer see any evidence of mites or mite activity on your plants.
It’s often recommended to use neem oil in combination with other methods, like for example using an insecticidal soap (more on that later!)
Warning: Whilst neem oil is a natural substance, it’s really potent stuff! Use gloves when applying to your plants and limit contact with bare skin. Do not ingest it & keep out of the way of children & pets.
Rosemary oil is another natural extract that you mix with water & either spray or sponge onto the tops and bottoms of the leaves of your plants.
It is a very effective spider repellent and also affects spider mite egg laying behaviour, again disrupting the reproductive cycle.
A study (in a greenhouse trial) by the University of British Columbia found “a single application of Rosemary oil based pesticides at its recommended label rate could reduce a two spotted spider mite population by 52%”.
Other potentially beneficial essential oils that have proved effective at killing spider mites (and their eggs) in studies include chamomile, spearmint and coriander.
As mentioned, spider mites are resistant little blighters.
They are able to become resistant to certain efforts to control infestations making them even harder to treat later when they have immunity to that tactic.
Try switching up which products you use to treat and repel spider mites semi-regularly.
Biochemical pesticides affect spider mites on contact, but they have the potential to affect natural predators too.
Plan your process carefully and apply biopesticides to your plants to minimise mite numbers before you introduce any predatory insects into the mix (not after!)
Always do a patch test, and spray a small amount of your chosen biopesticide on a single leaf before treating your whole plant or all of your plants.
There are biopesticide products available to buy to treat your infestation, but equally, when it comes to using essential oils, you can often buy the active ingredient and mix your own treatments.
When using essential oils, adding a little dish soap to the oil and water mix will help it to emulsify better – be careful if you’re growing organically here though, check the label on the soap.
Garlic is known to be a pest repellent and fungicide. It can be used to treat smaller and less advanced spider mite infestations.
Blend some garlic cloves with some water and leave to infuse for a day or two.
Strain any solids out and decant into a spray bottle to treat your plants in the same way as if you were using a biopesticide. (Store it in the fridge in between uses.)

Starting to sound like I’m listing ingredients to make a curry now! 😋
…But in all seriousness capsaicin which is the active ingredient in hot chilli peppers can also be used to kill spider mites and deter future mites from setting up camp in your indoor garden!
Cayenne works well against insects that feed on plant tissue, such as spider mites, helping to kill any existing mites while deterring future mites from visiting the area.
This study found that extracts taken from jalapeños and cayenne peppers killed approximately 45% of adult spider mites.
A quick search on Google will provide you with ready made chilli pepper mite treatments or you can make your own at home.
You can add 1 teaspoon of cayenne powder to a liter of water, let it sit for 24 hours then decant into a spray bottle, or boil up dried chillies then blend together before straining into a spray bottle.
Just be careful not to get either mixture in your skin or eyes! And don’t breathe in the fumes from boiling chillies either! I can confirm from experience that it’s no fun. 😵
Some people even add garlic into their chilli concoction to supercharge the mix.
Diatomaceous earth or DE is a natural insecticide. It’s deadly to insects and arachnids but non toxic to people and pets.
It is a white or cream coloured powder made from the fossilised remains of diatoms – ancient microscopic aquatic creatures.
DE is effective because each particle has razor sharp microscopic edges. These cut and penetrate spider mite’s protective exoskeletons and cause them to dehydrate and die.
There’s also the added bonus that spider mites can’t build an immunity to it!
Always choose food grade diatomaceous earth. Then when you need to apply, you’ve got several options.
1. Sprinkle it liberally onto the leaves of your plants and over the soil too.
2. Mix it with water then spray this all over the leaves and soil as well.
It’s important to point out that DE is rendered ineffective when wet, so dry application is preferable but more tricky when you need to apply it to the underneath of leaves.
Wet application can be easier, but the DE will only become effective once more when and if the water has evaporated completely.
If you’re fighting a strong infestation, I’d go with dry application and repeat long enough after watering or foliar feeding that the plant’s surfaces are dry.
If you’ve got a lot of air movement inside your grow space, that’ll also dislodge some DE, so reapplication will be necessary.
Warning: Always wear a mask when dealing with diatomaceous earth and keep children & pets out of the way.
Soap has been used for over 200 years to control insect pests. It works when it comes directly into contact with spider mites.
It works similarly to diatomaceous earth in that it penetrates the skin or exoskeleton of pests and then dries the critters out.
Normally you spray insecticidal soap on your plants until they’re saturated because the soap can only work on pests when it is wet.
Insecticidal soap is not usually toxic to people or pets and depending on the particular soap, it can be used in organic farming.
…But insecticidal soaps are not usually organic, hence it being part of the chemical treatment list of this post.
Soap alone won’t wipe out an infestation (as it doesn’t kill the eggs,) but it will minimise you spider mite numbers.
It’s recommended to apply multiple times and at intervals of between five and ten days to get the best results.
If your plants are under a lot of stress (from drought, or heat etc) you shouldn’t use insecticidal soap.
Ensure you always check the label and verify that the soap is suitable for use on your particular plants.
Sulphur is a naturally occurring chemical found in many fruits and vegetables.
It’s an element that’s safe to use on cannabis and can be used as a natural pesticide to treat spider mites.
Avoid sulphur burners and instead opt for a sulphur based spray and treat all the leaf surfaces.
Sulphur has the added benefit of being a fungicide which could help you guard against powdery mould and mildew too!
There are some store cupboard staples that can also be helpful in your retaliation against spider mites.
Recommendations of quantities or ratios for dish soap to water vary.
“The Oregon State University extension service recommends mixing 3 tablespoons of dish soap with a gallon of water to kill spider mites” weekly or as necessary.
But others recommend a less concentrated mix of 1 teaspoon of liquid dish soap to 1 litre warm water.
This can then be applied with a sponge or using a spray bottle.
Whichever concentration you go for, be sure to use regularly to get the best results.
As mentioned above, you can use dish soap to help you mix any essential oils with water in any biochemical or natural preparation – just be careful if you grow organically (always check the soap’s label!)
Isopropyl alcohol is often kept under the kitchen sink for cleaning and degreasing, but it can also kill spider mites!
There are a couple of different ways you can apply it:
1. Neat on a cotton ball or pad. Rub it all over your plants leaves and let it sit for an hour or two before washing it off with water.
2. Mix isopropyl alcohol with water and apply liberally to all plant surfaces with a sponge to wipe off any eggs and webs.
3. Mix water and alcohol together (1 part water to 1 part alcohol) in a bottle and spray the leaves with it. For less hardy plants you could use a ratio of 1 part alcohol to 3 parts water.
Remember: Make sure you safely dispose of any sponges or cotton pads used.
What if you’ve tried mixing up concoctions of essential oils, pantry staples and cleaning materials but are still struggling to wrangle an infestation under control?
It might be time to consider using a commercially available chemical treatment…
But this is not a decision to take lightly!
*This should be an absolute last resort!*
The reason is that chemical treatments can cause negative effects if they are ingested or come into contact with skin for a prolonged period of time.
Chemical treatments pose a risk to people and animals.
They can also contaminate soil, drinking water or consumables.
So with those important points made, what chemical treatments do people use to treat spider mites on plants?

There are plenty of chemical concentrates, solutions and sprays that you can use for pest prevention and treatment.
But remember, spider mites are arachnids not insects and therefore aren’t effectively controlled by some traditional insecticides.
Always check the label on any insecticide to verify if spider mites are on the list of pests that it is effective against.
Depending on whether you grow as a hobby, or are a professional grower, the insecticides that you can get your hands on may vary.
Also different countries have different rules and regulations about what can and can’t be legally used (and on what kinds of crops.)
Often insecticides come with a list of “phytosanitary rules” that you should absolutely adhere to.
These rules protect people and animals from the risks that come with toxins and contaminants in consumables.
A “safety period” is the amount of time that has to pass between the application of the insecticide and when it’s safe to re-enter that space again or when it’s safe to use or consume the crop that was treated.
Some commercial growers that use pesticides wait even longer (extra days or even weeks) than the amount of time suggested by the product manufacturer.
These things should ring alarm bells for you!!
Warning: If you’re growing cannabis you shouldn’t use insecticides during flowering.
Use a ‘moistening agent’ first. This will improve the efficacy of the active ingredients.
Remember that some products will be suitable for eggs, and some for adults and you may need to use a combination of both to get an infestation under control.
Be thorough, if you miss some spider mites when applying the treatment, there’s a good chance they will develop resistance to that particular insecticide, making it harder to treat infestations in future.
Follow safety protocols and wear gloves, goggles, a mask or whatever the product you’ve chosen recommends.
Remember: Chemical treatments like insecticides should be your absolute last resort!
The internet is awash with people using a solution of bleach and water to treat spider mites infestations.
The suggested ratio is 1 tablespoons of bleach to a gallon of water.
The application method is what you’d expect, similar to insecticidal soap, spray onto the affected surfaces of your plant. In the evening when it’s cooler.
I personally wouldn’t use this method if at all possible. Bleach is harmful to aquatic life when it gets washed down drains or poured into the ground.
If it was the ONLY thing you had available to use, I’d do a patch test on one leaf before treating the whole plant, and then I’d rinse off well with water after 15 minutes or so.
At Grow, we want to create products that make indoor growing more efficient and sustainable to minimise environmental harm.
We always use natural ways of treating and preventing pests, working with nature, not against it and we think you should too!
For the sake of completeness, I’ve touched on chemical treatments for spider mites here…
But I can’t with a clear conscience recommend or promote the use of insecticides or bleach in treating spider mites – there are better ways!
Integrated pest management is an environmentally sensitive approach using multiple techniques to work towards solving pest problems safely.
This can involve a variety of things such as:
This approach makes so much sense.
Integrated pest management aims to manage pests and the damage they cause in the most economical way and with the least harm to the environment and people.
It’s often something used in larger scale agriculture, but all growers can choose to use some principles of IPM in their approach to growing.
I’m sure by now having covered just how crafty and resilient spider mites are, you’ll understand why this step is crucial!
Having chosen your weapons of choice, you need to set about methodically treating any infestation repeatedly – every few days.
This is important to reduce the number of mites at all life cycle stages, on all of your plants.
Use a variety of treatment types to raise your chances of combating the infestation effectively.
And when you think they’re gone… go for one more round of follow ups, just to make sure!
At some point, you may find yourself facing a difficult decision.
Do you opt for a stringent, chemical treatment that’s not ecologically friendly and could due to its strength and repeated use damage your plants?
Or do you go down the route of using multiple manual, biological or organic methods that are safer but more labour intensive.
If you’re up against particularly resilient spider mites and can see this cycle repeating endlessly, this might not be enough to salvage your plants.
You’ll have to carefully weigh your options, and only you can decide if it’s the right time to write off any plants to reduce the potential spread.
Whilst no one wants to lose their plants, it could be time to think about safely dispatching infested plants and then really thoroughly cleaning your grow room or tent before starting afresh.
If a severe infestation prompted you to cull your crop, wait 10 – 14 days and clean the grow space again before starting your next grow in there.
This is a tough question to answer because it depends on so many things… But you’re certainly not going to fix a spider mites issue overnight!
Using a combination of treatment methods over a number of weeks should give good results… But it depends on how severe your infestation was to begin with.
The old saying goes, prevention is better than cure and it’s 100% true when it comes to spider mites!
There are a number of steps you can take to prevent mites in the first place or avoid re-infestation.
Make sure that you’re keeping your cultivation area both tidy and more importantly clean.
In an ideal world, you’d make sure you clean your tools after use each day and wear clean clothes before entering the grow space to avoid any pests hitching a ride in.
If you’re growing as a hobby, that’s potentially overkill, but if growing is your business you should definitely be taking these steps!
Make sure you collect up any dead leaves or other organic matter and remove it from your grow room completely… Don’t just pop it in the bin next to your tent or sweep it into a corner.
Dead or decaying plant matter needs to be removed from your grow space.
Make sure you do a thorough clean and disinfect the whole grow area in between each and every grow cycle.
You shouldn’t let any other people or pets that have been outside enter your grow space, but there are other ways mites can get in – on new plants or clones, through vents and in soil.
If you’re bringing new plants into your grow space, the absolute minimum you should be doing is inspecting them really thoroughly first.
You can do the paper test and tap the leaves of new plants to see if any pepper-like particles fall from the leaves – if they do, don’t bring them into your space!
You can also use a hand lens to inspect for mites, larva & eggs.
Inspection isn’t foolproof though.
Quarantine is much safer and preferable as many growers bring spider mites into their spaces on infected clones.
Just a couple of eggs or mites on one clone is enough to start an outbreak!
Ideally keep all new plants away from your current plants in your grow space for a minimum of a week (ideally longer!) until you’re sure they are pest free.
Spider mites can be transported over wide areas on the breeze alone so be careful of any vents or ducting spider mites could use to enter your grow space from outside and make sure you’ve got some sort of filter in place.
If you grow in soil, using a top quality, sterile potting soil can help you to avoid spider mites that might be present in for example, home made compost.
Or you might consider growing hydroponically because spider mites favour environments containing soil.
If you’ve had problems with spider mites before when growing from clones, you might consider growing from seed instead as they can’t come pre-infested with mites.

Ensure your grow environment is working for you, not against you in your campaign against spider mites.
I’ve spoken about the conditions that spider mites thrive in, and fortunately, they are not the same conditions that help you grow the best and happiest cannabis plants.
So if you’re taking proper care of your plants and being mindful of meeting their environmental needs, you’re well on your way to creating an inhospitable environment for spider mites anyway.
Your plants will be healthier and better prepared to fight off pests and diseases.
Plants that are stressed or weakened by less appropriate environmental conditions are much more likely to have problems.
You can find out more about ideal environmental conditions here:
What is the ideal temp and humidity for a grow tent? (Part 1)
What is the ideal grow room temp and humidity? (Part 2)
Read on to find out what environmental factors you should be paying close attention to:
Because spider mites thrive in dryer, less humid conditions (20% relative humidity,) try to keep humidity higher and maintain a relative humidity of 55-60%.
Higher humidities in vegetative and flowering don’t only deter spider mites, but can slow the rate of egg laying and therefore slow down a population increase.
This can buy you some time to treat any infestation you do have.
Any plants that are subject to water stress are more prone to mites being able to take hold.
You can mist your plants regularly with water from a spray bottle or use a humidifier to keep humidities up.
Spider mites love the heat and can reproduce the fastest at 27°C, so try and ensure that your temperatures don’t exceed 25°C.
By doing that you’ll bee keeping those all important terpenes intact too!
VPD is a measure of how much pressure is being exerted on your plants which then governs how stressed they are.
So keeping humidity and temperature at the optimum levels ties back to the ideal VPD for each stage of growth.
Early flower is quite often when things go awry and people start worrying about mould creeping in and so reduce the humidity in their grow space accordingly.
This well intentioned action unfortunately allows spider mites to take hold.
Instead, in early flowering, you should be optimising plant growth, and ensuring your plants are growing as fast and vigorously as possible.
To do this, you need to be in the VPD sweet spot where the plants are happiest and therefore the healthiest they can be.
This in turn will keep spider mites at bay because you’re not creating a hospitable environment for them.
This will also probably mean you’re putting less strain on hvac & dehumidification systems so you’ll be saving energy too.
You can maintain a lower VPD and a more humid and less stressful environment for your plants right up until week 5 or 6 of flower.
Whilst this is not a complete preventative, this should minimise the risk of spider mites and result in better quality plants.
Get our FREE VPD calculator and environmental timeline here and always know what your ideal VPD to aim for at any stage in your grow!

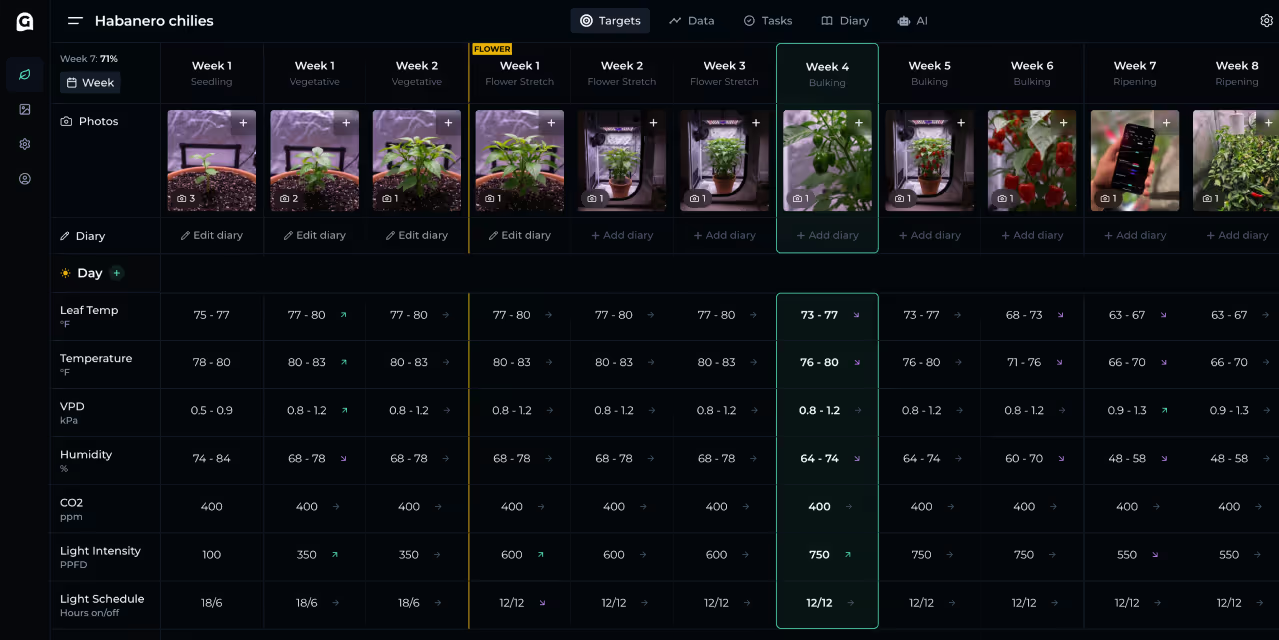
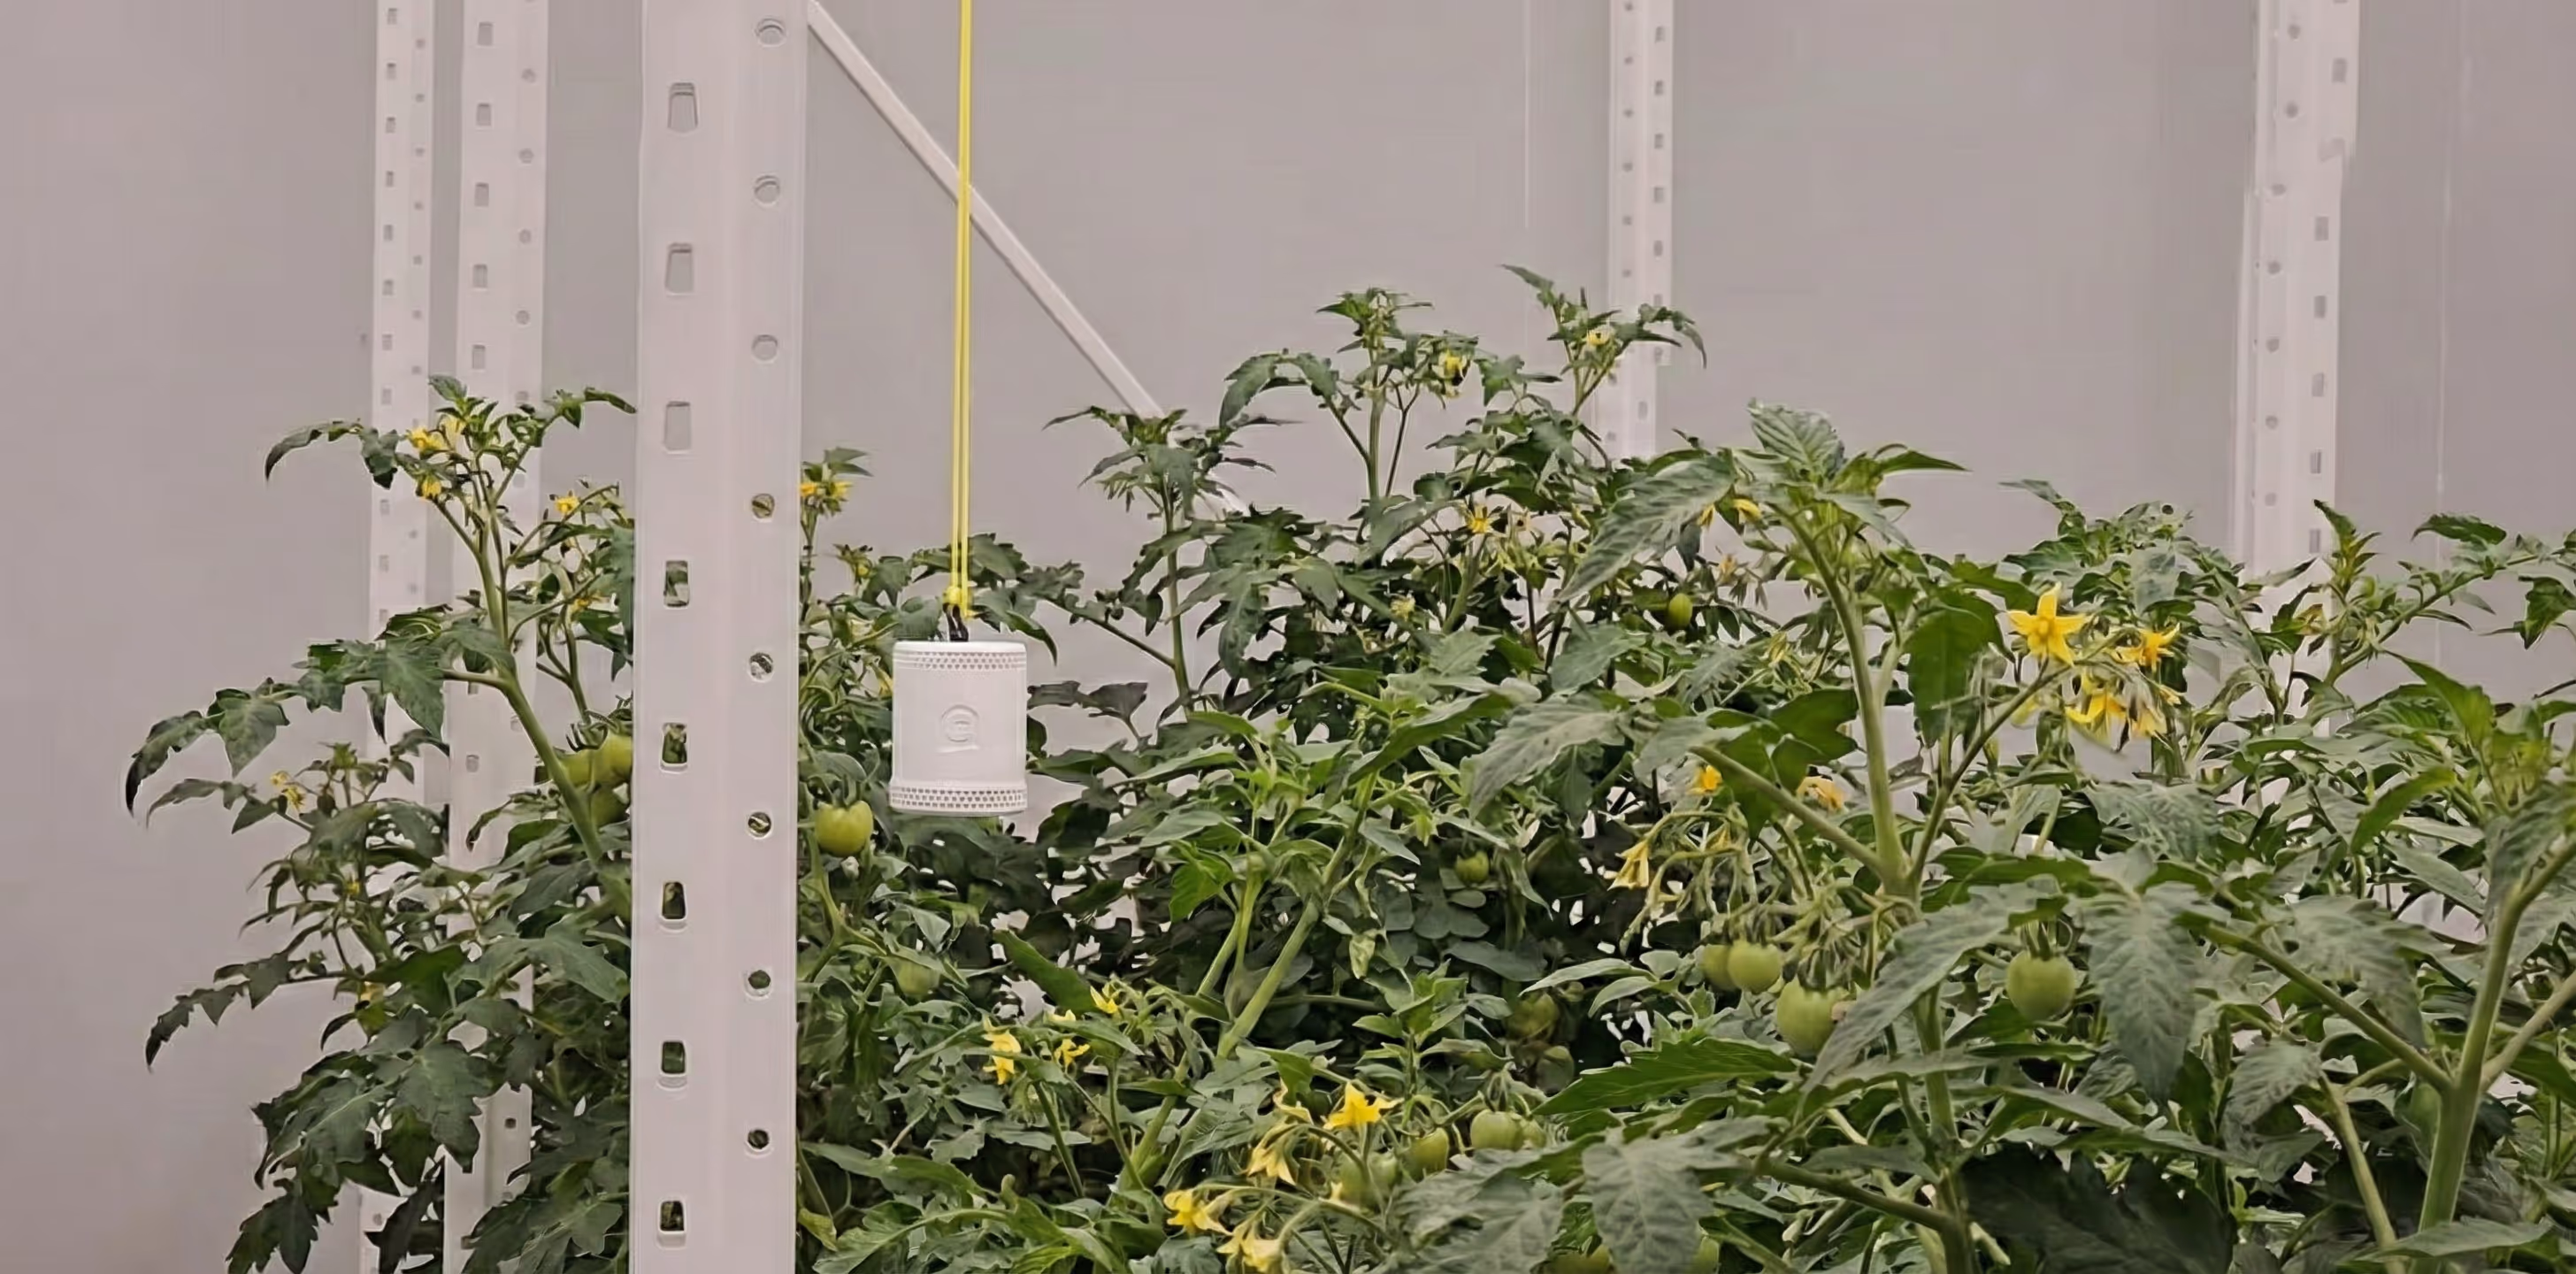
Using a grow room monitor or Grow Sensor is a great way to continuously monitor the environmental conditions inside your grow space.
The data that devices like this generate allow you to act decisively and make changes to your environment that can both boost your grow and prevent pests like spider mites.
Find out more about grow sensors here.
Spider mites vastly prefer still air.
If you can create and maintain a steady flow of air inside your grow space, it can help prevent spider mites as well as slowing down the rate of reproduction if you have got a population already in residence.
Air flow is important to prevent mould and mildew too.
Whilst you want to be giving your plants optimum nutrition, be careful not to overdo it!
Too much nitrogen, surplus to what your plants can use, doesn’t give any extra benefit to the plant, but does have an interesting side effect…
It makes your plants sap sweeter and therefore more attractive to spider mites!
The solution is to feed your plants what they need and no more.
Another tool in your arsenal to ward off spider mites or avoid re-infestation is to use predator mites as a preventative.
Application is similar to if you were treating an infestation, except instead of applying the predator mites to the infestation points, you’ll want to distribute them evenly between the plants in your grow space.
This is a nightmare scenario, but important to cover nonetheless.
Whilst I’ve covered a number of physical, biological, biochemical, natural and chemical treatments and preventatives above, many of these are not appropriate to use in the mid to late stages of flowering.
You have to think of the end use of your product.
You don’t want to be using harsh chemical treatments or insecticides during flowering that will still be present in the plant material at harvest time.
They can be harmful to people and bad tasting or toxic if they are ingested.
Likewise natural biopesticides like pyrethrins, neem, cinnamon and rosemary, or natural substances such as garlic and chilli or insecticidal soaps (even if they’re organic) are very likely to taint your buds and impart a bad fragrance and taste.
Diatomaceous earth being a powder, will adhere itself to your plant’s sticky trichomes so that’s problematic and not to be recommended in flowering either.
If you need to control a small infestation during flowering, the safest methods to employ are:
Physical methods – pruning, manually removing and picking off affected plant material, using a hand held hoover or sponging down your plants.
Biological methods – predatory mites, but this is really dependent on how small your small infestation is!
If you’ve got large numbers of mites, you need to think of the webbing, discarded egg and larval cases and dead mites that may be present on your buds already.
No one should be ingesting that either. (see above, know when to cut your losses!)
Some commercial growers use CO2 to try to combat red mites infestations because it’s toxic in very high concentrations… but CO2 kills people at high concentrations too! 💀
So I can’t in good conscience recommend this!
I can’t stress enough, prevention is better than cure, because during flowering, your pest control options become very, very limited.
Spider mites happen to all indoor growers sooner or later.
If afforded the right conditions, these tiny arachnids can rapidly multiply and colonise your plants and grow space.
They cut open your plant’s leaves and cells and suck out their lifeblood! Leaving a trail of damage and destruction and inhibiting your plants from photosynthesising efficiently.
The webs they create can render your buds and final product unusable.
Swift action is required to take control of any infestation before it’s too late. Avoiding large-scale infestation in flowering is an absolute must!!
There are many different approaches for you to choose from.
Often a multi pronged attack is the best, using a combination of physically removing the mites and eggs, introducing predatory mites, using biochemical pesticides or natural and kitchen cupboard staples.
Treatments will need to be repeated multiple times to ensure you’ve dealt with subsequent generations hatching all the time.
Chemical treatments should always only be used as a last resort.
Be very cautious about what treatment methods you employ in late flowering or in the run up to harvest time.
Wherever possible, prevention is better than cure, so create a clean and tidy environment in which your plants will thrive but mites will not.
Using a tool like a grow sensor will help you keep track of environmental conditions.
Environmental monitors enable you to tweak conditions accordingly to promote strong plant growth and dissuade pests.
In the midst of an infestation, it might seem like you’re fighting a losing battle, but don’t give up!
I hope this post provides you with knowledge, actions and options to get rid of spider mites and get your plants back to full health.
Get the latest grow tips – subscribe to the Grow The Best newsletter now!


.avif)